CLINICAL METHODS1
LEARN THROUGH YOUR COURSE AND FORTIFY ALL YOUR WEAKNESS WITH KNOWLEDGEOUMA
Click here to access Unit one Content..
Topic 1: COMMUNICATION SKILLS IN CLINICAL METHODS
The Patient def;
The word 'patient' is derived from the Latin patiens, meaning sufferance or forbearance.
The overall purpose of medical practice is to relieve suffering. In order to achieve this purpose, it is important to make a diagnosis through history taking, physical examination, relevant investigations and interpretation of the results which shall be important in the approach to design an appropriate scheme of management for each patient.
Clinical methods
The skills clinicians use to achieve the aim of excellence in clinical practice.
These skills evolve and change as new techniques and concepts arise, and as the doctor develops in experience and maturity.
Clinical methods are acquired by a combination of study and experience, and there is always something new to learn.
The initial aims of any first consultation are to understand the patient's own perception of their problem and to start or complete the process of diagnosis.
This double aim requires a knowledge of disease and its patterns of presentation, together with an ability to interpret a patient's symptoms and signs.
Appropriate skills are needed to elicit the symptoms from the patient's description and conversation, and the signs by observation and physical examination.
Difficulties posed by assessing the patients themselves, or by the variety of cultural and ethnic backgrounds found in modern life, must be accepted and factored into the interpretation of the data acquired during the consultation.
This requires not only experience and considerable knowledge of people in general, but also the skill and interest in people to strike up a relationship with a range of very different individuals.
There are two main steps to making a diagnosis:
- To establish the clinical features by history and examination - this represents the clinical database
- To interpret the clinical database in terms of disordered function and potential causative pathologies, whether physical, mental, social, or a combination of these.
Communication Skills in Clinical Practice
Introduction
Communication skills are notoriously hard to describe. There are too many possible situations that you might encounter to be able to draw rules or guidelines.
In addition, your actions will depend greatly on the personalities present—not least of which your own!
Communication models
- Patient-centered communication
In recent years, there has been a significant change in the way healthcare workers interact with patients. The biomedical model has fallen out of favor and instead, an appreciation has evolved that the patient has a unique experience of the illness.
This experience involves the social, psychological, and behavioral effects of the disease.
Some authors refer to this approach as the biopsychosocial model, which focuses on the patient in a more encompassing way.
2. The biomedical model
The provider is in charge of the consultation and examination.
Focus is on disease management.
Power and decision-making are shared
Address and treat the whole patient.
Key points in the patient-centered model
Explore the disease and the patient’s experience of it:
Understand the patient’s ideas and feelings about the illness.
Appreciate the illness’s impact on the patient’s quality of life and psychosocial well-being.
Understand the patient’s expectations of the encounter.
Understand the whole person:
- Family
- Social and work environment
- Beliefs
- Find common ground on disease management.
- Establish the doctor–patient relationship.
- Be realistic:
- Priorities for treatment
- Resources
Confidentiality;
As a doctor, health-care provider, or student, you are party to personal and confidential information.
There are also times when confidentiality must or should be broken as seen later.
The essence of day-to-day practice is: Never tell anyone about a patient unless it is directly related to his or her care and you have permission.
This includes relatives, which can be very difficult at times, particularly if a relative asks you directly about something confidential.
You can reinforce the importance of confidentiality to relatives and visitors. If asked by a relative to speak about a patient, it is a good idea to approach the patient first and ask their permission, within full view of the relative.
You can also seek permission from the patient in anticipation of such queries.
This rule also applies to friends outside of medicine.
As care providers, we come across many amazing, bizarre, amusing, or uplifting stories on a day-to-day basis, but like any other kind of information, these should not be shared with anyone.
If you do intend to use an anecdote in public, at the very least you should ensure that there is nothing in your story that could possibly lead to the identification of the person involved.
If you are in a small community, it is best to avoid sharing anything, lest you undermine your reputation as a professional.
Click here to access Unit one Content..
Topic 1: COMMUNICATION SKILLS IN CLINICAL METHODS (Cont' 1)
Essential considerations in communication;
Patients are entrusting their health and personal information to you—they want someone who is confident, approachable, competent, and, above all, trustworthy.
First impressions count—and studies have consistently shown that your appearance (clothes, hair, makeup) has a great impact on patients’ opinion of you and their willingness to interact with you.
Part of that intangible professionalism comes from your image.
The white coat is still part of medical culture for students and most providers. Fashions in clothing change rapidly, but some basic rules still apply:
Neutralize any extreme tastes in fashion that you may have.
Men and women should wear appropriate professional attire.
Women may wear skirts or slacks but the length of the skirts should not raise any eyebrows.
Necklines should not be revealing—no décolletage (not revealing the cleveage)!
The belly should be covered—no bare midriffs!
The shoulders, likewise, should be covered.
Shoes should be polished and clean.
Clean surgical scrubs may be worn, if appropriate.
Hair should be relatively conservatively styled and no hair should be over the face. Wear long hair tied up.
Personal appearance….
Your name badge should be clearly visible, even if you don’t like your picture.
Stethoscopes are best carried or held in a coat pocket—worn at the neck is acceptable but a little pretentious, according to some views.
Try not to tuck items in your belt—use pockets or belt-holders for cell phones, keys, and wallets.
Psychiatry, pediatrics, and a handful of other specialties require a different dress code, as they deal with patients who require differing techniques for bonding with the health-care professional.
If in a hospital setting, make sure that your discussion with a patient is not during an allocated quiet time or disturbing to the patient’s roommate.
You should also avoid mealtimes or when the patient’s long-lost relative has just come to visit.
If you plan to move the patient from the bed to an exam room, ask the supervising doctor (if not you) and the nursing staff, and let all concerned know where you have gone in case the patient is needed.
Students, doctors, and other medical providers tend to see patients on hospital floors filled with distractions that can break up the interaction
Often such meetings are necessary during the course of the day. However, if you need to discuss an important matter that requires concentration from both of you, consider the following conditions:
The room should be quiet, private, and free from disturbances.
There should be enough seating for everyone.
Chairs should be comfortable enough for an extended conversation.
Arrange the seats close to yours, with no intervening tables or other furniture.
Essential Communication Rules
1. Avoid medical jargon
Medical personnel are so immersed in jargon that it becomes part of their daily speech.
The patient may not understand the words or may have a different idea of their meaning.
Technical words such as myocardial infarction are in obvious need of avoidance or explanation.
Consider also terms such as exacerbate , chronic ,numb , and sputum —these may seem obvious in meaning to you but not to the patient.
You may think that some terms such as angina and migraine are so well known that they don’t need explanation, but these are very often misinterpreted.
Some examples of words with varied interpretations between patient and doctor
2. Remember names
Forgetting someone’s name is what we all fear; it is relatively easy to disguise by simple avoidance. However, using the patient’s name will make you appear to be taking a greater interest in them.
It is particularly important that you remember the patient’s name when talking to family members.
Getting the name wrong is embarrassing and can seriously undermine their confidence in you.
Aside from actually remembering the name, it is a good idea to have it written down and within sight—on a piece of paper in your hand, on the chart, or on the desk. It is a best practice to confirm the identity of the patient, using two identifiers (name, date of birth [DOB]), before you read results from the chart or electronic medical record (EMR). To be seen glancing at the name is forgivable; patients would rather have you double check than bluff your way through an interview.
Click here to access Unit one Content..
Topic 1: COMMUNICATION SKILLS IN CLINICAL METHODS (Cont' 2)
How
to begin an encounter with a patient;
Getting started
The start of an encounter is important but is fraught with potential difficulties.
There are no hard-and-fast rules.
Issues you should take into consideration include the following:
- Are you using a language the patient can understand?
- Can the patient hear you?
1. Greeting
Beware of saying “good afternoon” or “good morning.” These greetings can be inappropriate if you are about to break some bad news or if there is another reason for distress. Consider instead using a simple “hello.”
2. Shaking hands
A traditional greeting, shaking hands will be readily accepted by most patients, but it can also present challenges (think of patients with severe arthritis of the hands).
While physical contact always seems friendly and can warm a person to you, a handshake may be seen as overly formal by some and inappropriate by others.
Consider using some other form of touch, such as a slight guiding hand on the patient’s arm as they enter the room or a brief touch to the forearm.
Introductions; This is a minefi eld! You may wish to alter your greeting depending on the circumstances—choose terms that suit you.
3. Title—patient
Older patients may prefer to be called “Mr.” or “Mrs.”; younger patients would find this odd. For female patients whose marital status you don’t know, you can try using “Ms.,” although some younger or married patients may find this term offensive.
Calling the patient by their first name may be considered too informal by some patients. A change to using the family name mid-way through the encounter may appear unfriendly or could indicate that something has gone wrong with the interaction.
There are no rules here; use common sense to judge the situation at the time. When unsure, the best option is always to ask.
“Is it Mrs. or Miss Onyango?” “How would you like to be addressed?”
4. Title—you
The title doctor has always been a status symbol and a badge of authority—within the health-care professions at least.
Young doctors may be reluctant to part with the title so soon after acquiring it, but these days, when office visits are becoming two-way conversations between equals, patients may expect equity in the way they are addressed.
Many patients will simply call you “doctor” and the matter doesn’t arise.
We prefer using formality initially, then using first names if circumstances seem appropriate. Some elderly patients prefer—and expect—a certain level of formality, so each situation has to be judged.
Mid-level providers should follow the conventions of the health-care setting they are in. Formality is appropriate in many settings; however, most mid-level providers are more comfortable using first names.
5. Standing
Although this might be considered old-fashioned by some younger people, standing is a universal mark of respect. You should stand when a patient enters a room and take your seat at the same time as them.
You should also stand as they leave, but if you have established a good rapport during the visit, this isn’t absolutely necessary.
You may notice that patients stand when you enter the exam room. Put them at ease and acknowledge this gesture as well.
General principles of Communication
General principles of Communication
1. Demeanor
Give the patient your full attention. Appear encouraging with a warm, open manner.
Use appropriate facial expressions—don’t look bored!
2. Define your role
Along with the standard introductions, you should always make it clear who you are and what your role is.
You might also wish to introduce your team members, if appropriate.
In this era, when patients see so many health-care providers during the course of a hospitalization, it is helpful to write the team names down for them.
Style of questioning
- Open questions vs. closed questions
- Open questions are those for which any answer is possible:
- “What’s the problem?”
- These enable patients to give you the true answer in their own words.
- Be careful not to lead the patient or cut them off with closed questions.
- Compare “How much does it hurt?” with “Does it hurt a lot?” The first question allows the patient to tell you how the pain feels on a wide spectrum of severity; the second one leaves the patient only two options and will not give a true reflection of the severity.
- Multiple-choice questions
Often, patients have difficulty with an open question if they are not quite sure what you mean.
A question about the character of pain, for example, is rather hard to formulate, and patients will often not know what you mean (“What sort of pain is it”; “What does it feel like, exactly?”).
In these circumstances, you may wish to give them a few examples, but leave the list open-ended for them to add their own words. You must be very careful not to give the answer that you are expecting from them.
For example, a patient whom you suspect has angina (“crushing” pain) you could ask the following: “What sort of a pain is it—burning, stabbing, or aching, for example?”
8. Clarifying questions
Use clarifying questions to get the full details: “When you say ‘dizzy’, what exactly do you mean?”
9. Reflective comments
Use reflective comments to encourage patients to continue and reassure
them that you are following the story: “Yes, I see that.”
Staying on topic
You should be directive but polite when keeping patients on the topic you want or moving them on to a new topic.
Don’t be afraid to interrupt them—some patients will talk for hours if you let them!
“Before we move on to that, I would just like to get all the details of this dizziness”.
“We’ll come to that in a moment.”
Recognize potentially offensive or embarrassing questions. Explain why it is necessary to ask these questions, to put the patient more at ease.
“This may be an uncomfortable question, but I need to know…”
Eye contact
Make eye contact and look at the patient when he or she is speaking.
Make a note of eye contact next time you are in conversation with a friend or colleague.
In normal conversations, the speaker usually looks away while the listener looks directly at the speaker. The roles then change when the other person starts talking, and so on.
In the medical situation, while the patient is speaking, you may be tempted to make notes, read the referral letter, look at a test result, or check the EMR—you should resist this urge and stick to the customary rules of eye contact.
Adjusting your manner
You would clearly not talk to another provider as you would to someone with no medical knowledge. In much the same way, you should try to adjust your manner and speech according to the patient’s educational level. This is can be extremely difficult—you should not make assumptions about intellect or understanding solely on the basis of educational history.
Even the most educated patient can have low health literacy.
A safe approach is to start in a relatively neutral way and then adjust your manner and speech according to what you see and hear in the first minute or two of the interaction, but be alert to whether this is effective and make changes accordingly.
Understand that patients want to please and seem agreeable and may say “yes” when they really don’t understand
Interruptions
- Apologize to the patient if you are interrupted in the process of clerkship.
- Don’t take offence or get annoyed
- As well as being directly aggressive or offensive, people may be thoughtless in their speech or manner and cause offence when they don’t really mean to.
- As a professional, you should rise above this situation.
Communicating with deaf patients
- People who are hard of hearing may cope with this problem by using a hearing aid, lip-reading, or sign language. Whichever technique is used (if any), some simple rules should always apply:
- Speak clearly but not too slowly.
- Don’t repeat a sentence if it is misunderstood—say the same thing in a different way.
- Write things down, if necessary.
- Use plain English and be succinct.
- Be patient and take the time to communicate properly.
- Check understanding frequently.
- Consider finding an amplifier—many geriatric floors or clinics will have one available.
- Lip-readers
Patients who are able to lip-read do so by looking at the normal movements of your lips and face during speech.
Exaggerating movements or speaking loudly will distort these movements and make it harder for them to understand you.
In addition to the points above, when talking to lip-readers
10. Maintain eye contact.
11. Don’t shout.
12. Speak clearly but not too slowly.
13. Do not exaggerate your oral or facial movements.
Click here to access Unit one Content..
Topic 1: COMMUNICATION SKILLS IN CLINICAL METHODS (Cont' 3)
Cross-cultural communication
Cultural background and tradition may have a large influence on disease management.
Beliefs about the origin of disease and prejudices or stigma surrounding the diagnosis can make dealing with the problem challenging.
Be aware of all possible implications of a person’s cultural background.
For example, a Muslim may not take anything by mouth in the daylight hours during Ramadan. This may have serious implications for medication management, particularly for chronic diseases such as diabetes or hypertension.
Even something as benign (to you) as eye contact may have important cross-cultural implications.
For most individuals eye contact is desired, but for many Native American and Asian cultures, it carries negative connotations.
Above all, be aware of prejudice—yours and theirs. If you are not aware of cultural implications when seeing a patient of a different culture, ask for their input.
Interpreters
Interpreters maybe required for the:
- Patients with Limited English Proficiency (LEP)
- Those with hearing disabilities
Official communicators are bound by a code of ethics, impartiality, and confidentiality; friends and relatives are not.
It is often impossible to be sure that a relative is passing on all that is said in the correct way.
Sometimes, especially in urgent situations, the patient’s children are used to interpret. This is clearly not advisable for a number of reasons.
This places too much responsibility on the child, and the child may not be able to explain difficult concepts.
Conversations about sex, death, or other difficult topics are unsuitable for children to take part in; if they do, this will impede optimal communication.
Using an official interpreter
Before you start
- Brief the interpreter on the situation, and clarify your role and the work of the department, if necessary.
- Allow the interpreter to introduce themselves to the patient and explain their role.
- Arrange seating so that the patient can see both the interpreter and health-care provider easily.
- Allow enough time (at least twice as long as normal).
- During the exchange
- Speak to the patient, not the interpreter. This may be hard to do at first, but you should speak to and look at the patient at all times.
- Be patient—some concepts are hard to explain.
- Avoid complex terms and grammar.
- Avoid jargon.
- Avoid slang and colloquialisms that may be hard to interpret correctly.
- Check understanding frequently.
The interpreter may also provide information on the patient’s culture to assist in the communication.
Finishing off
- Check understanding.
- Allow time for questions.
- Take the time to debrief with the interpreter.
- If the conversation has been distressing, offer the interpreter support and let their employer know, if appropriate.
Written information
- If interpreting written information, read it out loud.
- The interpreter may not necessarily be able to translate written language as easily.
Imparting information
- There are some guidelines for imparting any information—good or bad—to a patient:
- Identify the topic for discussion.
- Identify the people present and ask if there is anyone else that they would like to be there.
- Establish previous experience and knowledge.
- Keep sentences and explanations short and simple.
- Repeat important information.
- Allow time for feedback and questions, and check understanding.
- Schedule time for follow-up.
- Be honest!
The importance of silence
In conversations with friends or colleagues, your aim is often to avoid silence, using filler noises such as “um” and “ah” while pausing.
In medical situations, by contrast, silences should be embraced and used to extract more information from the patient. Use silence in order to listen.
Practice is needed, as the inexperienced may find this situation uncomfortable.
It is often useful, however, to remain silent once the patient has answered your question.
You will usually find that the patient will start speaking again, and often provide useful and enlightening facts that you would otherwise not have gleaned.
Angry patients
- With angry patients, use body language to take charge of the situation without appearing aggressive. Throughout the exchange, you should remain polite, avoiding confrontation, and resist becoming angry yourself.
- Look to your own safety first.
- Calm the situation, then establish the facts of the case. Anger is often secondary to some other emotion, such as loss, fear, or guilt.
- Acknowledge the patient’s emotions through statements such as the following:
- “I can see that this has made you angry.”
- “It’s understandable that you should feel like this.”
- Steer the conversation away from the area of unhappiness and toward the positive and plans, to move the situation forward.
- Don’t incriminate colleagues—the patient may remember your throwaway comments, which could come back to haunt you. Avoid remarks like “he shouldn’t have done that.”
- Emphasize any grounds for optimism or plans for resolving the situation and putting things right.
Telephone and e-mail communication
The essential rule of confidentiality is that you must not impart personal information to anyone without the express permission of the patient concerned—except in a few specific circumstances.
You must not give out any confidential information over the telephone unless you are sure of the identity of the caller. All communication is best done face to face. This may cause difficulty if a relative calls to ask about the patient, but you should remain strict about this rule unless you have the expressed permission of the patient.
When discussing follow-up communication for test results, obtain the patient’s permission to leave a message on an answering machine or as voice mail. Check to see if you have their correct phone number.
E-mail communications can be very problematic, especially if you do not have a secure, encrypted system. Most health-care institutions have their own policy regarding use of e-mail, so you should know what the rules are.
Patient’s e-mails should nonetheless be answered. Some providers will call the patient back, documenting the communication in the EMR or chart. Others will ask the patient to set up an appointment.
The use of social media (e.g., Facebook, Twitter) in medicine is still evolving. It is best not to use these for any patient information.
If telephone communication is essential but you are in doubt as to the caller’s identity, you may wish to take their number, check it with your records, and then call them back.
Talking about sex
This can be a cause of considerable embarrassment for the patient and for the inexperienced professional.
Sexual questions are inappropriate to ask in the presence of friends or relatives, so ask them to leave the room.
Your aim is to put the patient at ease and make responses more forthcoming.
Make no assumptions about a patient’s sexual orientation.
The key is to ask direct, clear questions and show no embarrassment.
You should maintain eye contact.
You should also show no surprise whatsoever, even if the sexual practices described differ from your own or from those that you would consider acceptable.
Try to become familiar with sexual slang and sexual practices that you might not be familiar with.
A failure to understand slang may lead to an immediate barrier in the patient interview.
In general, you should not use slang terms first. You may wish to consider mirroring the patient’s speech as you continue the conversation.
Click here to access Unit one Content..
Topic 1: COMMUNICATION SKILLS IN CLINICAL METHODS (Cont' 4)
Breaking bad news
Students fear breaking bad news, and no one likes doing it. However, knowing that you have broken difficult news in a sensitive way and that you have helped the patient through a terrible experience can be one of the most uplifting aspects of working in health care.
Confirm all the information for yourself and ensure that you have all the information on hand, if necessary.
Speak to the nursing staff to get background information on what the patient knows, their fears, and details of their relationship with any family or friends who may be present.
Pick a quiet, private room where you won’t be disturbed.
Ensure that there is no intervening desk or other piece of furniture.
Arrange the chairs so that everyone can be seen equally.
Hand your pager and cell phone to a colleague or turn it off.
Invite a member of the nursing staff to join you, particularly if they have already established a relationship with the patient.
Remember, it is usually the nursing staff that will be dealing with the patient and relatives after you leave, so they need to know exactly what was said.
Would the patient like anyone in particular to be present?
Remember the general principles learnt earlier:
Avoid using jargon,
Speak slowly and clearly.
Establish previous knowledge
It is essential to understand what the patient already knows. The situation is very different for a patient who knows that you have been looking for cancer than that of a patient who thinks their cough is due to a cold.
“What have the other doctors told you?”
How much do they want to know?
This is key. Before you consider breaking bad news, you have to learn if the patient actually wants to hear it. Ask an open question, such as:
“Have you thought about what might be causing these problems?”
“Do you know why we’ve been doing these tests?”
You can also ask directly if they want to hear what you might have to say:
“Are you the sort of person who likes to know all the available facts?”
Warning shots when breaking bad news;
If they do want to know, you should break the news in a step-wise fashion, delivering multiple “warning shots.” This gives the patient a chance to stop you if they’ve heard enough or to ask for more information.
Keep your sentences, short, clear, and simple. A conversation may go like this:
You : I’m afraid the test results show that things are more serious than first thought.
Patient : What do you mean more serious?
You : Some of the cells look abnormal.
Patient : Do you mean that I have cancer?
You : Yes.
At any point, the patient may stop you, signaling that they don’t want to hear more about it.
Inexperienced practitioners sometimes feel that they ought to tell the patient the full story, but they must understand that many people would much rather not hear the words said aloud—this is their coping strategy and must be respected.
More than likely, this will not be your only opportunity to speak with the patient.
You : I’m afraid the test results show that things are more serious than first thought.
Patient : Just tell me what we can do next.
Allow time for information to sink in
You should allow time for each piece of information to sink in, ensuring that the patient understands all that has been said and repeating any important information.
Remember also that patients will not be able to remember the exact details of what you have said—you may need to reschedule at a later time to talk about treatment options or prognosis.
Honesty, above all else
Above all, you should be honest at all times. Never guess, predict, or lie.
The patient may break your pre-prepared flow of information, requiring you to think on your feet. Sometimes you simply can’t abide by the rules above. If asked a direct question, you must be honest and straightforward.
For example:
Breaking bad news….
You : I’m afraid the test results show more than I had thought…
Patient: Just tell me, do I have cancer
You: Yes! I am afraid you do.
Don’t rush to the positive
When told of bad news, the patient needs a few moments to let the information sink in. After the “yes” in the previous examples, you should preferably wait in silence for the patient to speak next.
The patient may break down in tears, in which case they should be offered tissues and the support of relatives, if nearby.
If emotionally distressed, the patient will not be receptive to what you say next—you may want to give them some time alone with a relative or nurse before you continue to talk about prognosis or treatment options.
Above all, you should not give false hope . The moment after the bad news has been broken can be uncomfortable, and you must fight the instinctive move to positive,-sounding statements, such as “there are things we can do”; “on the plus side . . . ”; “the good news is . . .”; or something similar.
Ending
Summarize the information given, check the patient’s understanding, repeat any information as necessary, allow time for questions, and make arrangements for a follow-up appointment or a further opportunity to ask questions again.
Obviously, you shouldn’t make promises that you can’t keep.
Don’t offer to come back that afternoon if you’re going to be in clinic!
“Do you understand everything that we’ve discussed?”
“Is there anything else that you would like to ask me?”
“I’ll plan to see you tomorrow morning. I’ll be happy to come back in the meantime if you think of anything that you’d like to ask or if you need to talk. Just ask one of the nursing staff to page me.”
Questions about time
“How long have I got?” is one of the most common questions asked, and the hardest to answer.
As always, don’t guess and don’t lie.
It’s often impossible to estimate this. Giving a figure will almost always lead to you being wrong. If you don’t know, it is perfectly acceptable to say so.
Explain that it is impossible to judge, and ask if there is any date in particular that they don’t want to miss—perhaps they want to experience Christmas or a relative’s birthday.
Don’t assume that they are asking out of fear; some people are surprisingly practical and want to put their affairs in order before their death.
Body
language
Body language: an introduction
Body language is rarely given the place it deserves in the teaching of communication skills.
There are over 600 muscles in the human body—90 in the face, of which 30 act purely to express emotion.
Changes in your position or expression—some obvious, others subtle—can heavily influence the message that you are communicating.
We’ve all met someone and thought, “I didn’t like him” or “she seemed trustworthy.” Often these impressions of people are not built on what is said but the manner in which people handle themselves. You subconsciously pick up cues from the other person’s body.
Being good at using body language means having awareness of how the other person may be viewing you and getting your subconscious actions and expressions under conscious control.
If done well, you can influence the other person’s opinion of you, make them more receptive to your message, or add particular emphasis to certain words and phrases.
Click here to access Unit one Content..
Topic 1: COMMUNICATION SKILLS IN CLINICAL METHODS (Cont' 5)
Body language variations;
Touching
Touching is one of the most powerful forms of nonverbal communication and needs to be managed with care.
Greeting: Touch is part of greeting rituals in most cultures. It demonstrates that you are not holding a weapon and establishes intimacy.
Shaking hands: There are many variations. The length of the shake and the strength of the grip impart a huge amount of information. For added intimacy and warmth, a double-handed grip can be used. For extra intimacy, one may touch the other’s forearm or elbow. *
Dominance: Touch is a powerful display of dominance. Touching someone on the back or shoulder demonstrates that you are in charge—this can be countered by mirroring the action back.
Sympathy: The lightest of touches can be very comforting and is appropriate in the medical situation where another type of touch may be misread as dominance or intimacy (you shouldn’t hug a patient you’ve just met!). Display sympathy by a brief touch to the arm or hand.
Open body language
A cluster of movements are associated with seeming open . The most significant part of this is the act of opening—signaling a change in the way you are feeling.
Openness demonstrates that you have nothing to hide and are receptive to the other person.
Openness encourages openness.
This can be used to calm an angry situation or when asking about personal information.
The key is to not have your arms or legs crossed in any way. The key is to not have your arms or legs crossed in any way.
Arms open: either at your side or held wide. Even better, hold your hands open and face your palms toward the other person.
Legs open: this does not mean legs wide, rather, legs not crossed. You may hold them parallel. The feet often point toward something of subconscious interest to you—point them at the patient!
Emphasis
You can amplify your spoken words with your body, usually without noticing it. Actions include nodding your head, pointing, or other hand gestures.
A gesture may involve your entire body.
Watch TV news anchors—often only their heads are in view, so they emphasize with nods and turns of their heads much more than one would during normal conversation.
Synchrony: This is key. Time your points of the finger, taps of the hand on the desk, or other actions with the words you wish to emphasize.
Precision: Signal that the words currently being spoken are worth paying attention to with delicate, precise movements. You could make an ‘O’ with your thumb and index finger or hold your hands such that each finger is touching its opposite counterpart—like a splayed prayer position.
Eye level
This is a very powerful tool. In general, the person with a higher eye level is in control of the situation.
You can use this tactic to your advantage. When asking someone personal questions or when you want them to open up, position yourself such that your eyes are below theirs, meaning they have to look down at you slightly. This makes them feel more in control and comfortable.
Likewise, anger often comes from a feeling of lack of control—put the angry person in charge by lowering your eye level—even if that means squatting next to them or sitting when they are standing.
Conversely, you may raise your eye level to take charge of a difficult situation; looking down on someone is intimidating.
Stand over a seated person to demonstrate that you are in charge.
Watch and learn
You should watch others and yourself and consider what messages are being portrayed by nonverbal communication.
Stay aware of your own movements, and consider intentionally changing what would normally be subconscious actions to add to, or alter, the meaning of your speech.
Written communication
Written communication
Medical notes serve a number of purposes. The most important ones are as follows:
They are a record of the patient’s illness, treatments, and medical encounters, for use by other medical practitioners in the future.
They are the only record of your actions—and the means by which you may be judged in case of future disputes.
They are a record of events for the purposes of clinical audit.
How to write in the notes
Your entries in the notes should be tidy and legible. All entries should include the following:
- Date
- Time
- Medical information
- Signature (also print your name if your handwriting is illegible).
- Identity of the inscriber
- Contact number (pager and/or cell phone)
Use black ink only (blue often doesn’t photocopy easily and can fade).
What to write in the notes
Everything that occurs should be recorded. If it isn’t written down, it didn’t happen!
Remember especially to record discussions with relatives and the details of what the patient has been told of diagnoses.
There are no specific rules on how things should be written—there are a number of conventions introduced throughout the book.
In general, entries should be easily understood by another staff member.
Standard examination drawings
The essential rule is that the record you make should be easily understood by another person. If it is hard to describe where the cut on the patient’s foot is, draw it!
There are a number of diagrams that, though not official, are widely used and accepted as standard.
Law, ethics, and communication
It is also worth knowing the four bioethical principles, about which much has been written elsewhere.
Four bioethical principles
- Autonomy: a respect for the individual and their ability to make decisions regarding their own health
- Beneficence: acting to the benefit of patients
- Nonmalificence: acting to prevent harm to the patient
- Justice: fairness to the patient and the wider community when considering the consequences of an action
Confidentiality
Confidentiality is closely linked to the ethical principles described above.
Maintaining a secret record of personal information shows respect for the individual’s autonomy and their right to control their own information.
There is also an element of beneficence, whereas releasing the protected information may cause harm.
Breaking confidentiality
There are a number of circumstances in which confidentiality can, or must, be broken. The exact advice varies between different bodies.
In general, confidentiality may be broken in the following situations:
- With the consent of the individual concerned
- If disclosure is in the patient’s interest but consent cannot be gained If required by law
- When there is a statutory duty, such as reporting of births, deaths, and abortions, and in cases of certain communicable diseases
- If it is overwhelmingly in the public interest
- If it is necessary for national security or when prevention or detection of a crime may be prejudiced or delayed
- In certain situations related to medical research
Consent and capacity
There are three main components to valid consent. To be competent (or have capacity) to give consent, the patient
Must understand the information that has been given
Must believe that information
Must be able to retain and evaluate the information to make a decision
In addition, for consent to be valid, the patient must be free from any kind of duress.
It should be noted that an assessment of capacity is valid for the specific decision at hand. It is not an all-or-nothing phenomenon—you cannot either have capacity or not.
The assessment regarding competence must be made for each new decision faced.
Law, ethics, and communication….
Young people and capacity
All persons aged 18 and over are considered to be a competent adult unless there is evidence to the contrary.
People between 16 and 18 years of age may be treated as adults if they are covered by statutes regarding emancipated minors. However, the refusal of a treatment can be overridden by the courts.
Children age 16 and younger are considered competent to give consent if they meet the three conditions mentioned previously.
However, their decisions can be overridden by the courts or by people with parental responsibility.
Click here to access Unit one Content..
Topic 1: Summary
- Effective communication in clinical medicine is an essential skill for patient management.
- During an encounter with a patient, all the approaches in communication can be used depending on the unique setting.
- During communication, a clinician should identify any possible barrier and address them appropriately for effective communication.
Click here to access Unit one Content..
Topic 1: References
- Glynn, M., Deake, W. M., and Hutchson R., (2012). Hutchison’s Clinical Methods: An integrated Approach to clinical practice. Edinburgh Elsevier latest edition.
- Houghton A.R, Gray D. and Chamberlain, E.R. (2010). Chamberlains Clinical signs and symptoms in Clinical Medicine. London, Hodder Arnold.
- Lumley, J.S.P and Bailey H. (2001) Hamilton Baileys physical signs: Demonstration of physical signs: in Clinical Surgery.
- Macleod J. Douglas G. Nicol, E. F. and Robertson C. (2009). Macleod’s Clinical Examination Edinburg; Churchill Livingstone/ Elsevier
- Tally N. J. and O’ Conner, S. (2001). Clinical examination: A Systemic Guide to physical diagnosis. Diagnosis, Oxford: Blackwell science.
- Thomas J. and Mohaghan T. (2014) Oxford Hand book of clinical examination and practical skills. Oxford University press.
Click here to access Unit one Content..
Topic 2:HISTORY TAKING
The history
Areas to cover:
- Patient profile (PP)
- Chief complaint (CC)
- History of present illness (HPI)
- Past medical history (PMH)
- Allergies
- Drug history
- Alcohol
- Smoking
- Family history (FH)
- Social history (SH)
- Review of systems (ROS)
- The elderly patient
- The pediatric patient
History-taking
- The history is a patient’s account of their illness together with other relevant information you have gleaned from them.
- There is a tried and tested standard sequence that you should conform to and is used by all providers.
- It is good practice to make quick notes while talking to the patient that you can use to write a thorough history afterward—don’t document every word they say, as this breaks up your interaction!
- By the end of the history-taking you should have a good idea of a diagnosis or have several differential diagnoses in mind.
- The examination is your chance to confirm or refute these through the acquisition of more information.
- History-taking is not a passive process.
- You need to keep your wits about you and gently guide the patient in giving you relevant information through use of all the communication skills described earlier.
Different approaches;
Many people list information on smoking and alcohol as part of the social history.
Others feel that these factors have such a significant impact on health that they are more appropriately placed as part of the past medical history, rather than as what the patient does in their spare time.
It is good practice in medicine to watch what other practitioners do and adapt the parts that you feel are done well to your own style, making them part of your own routine.
The standard history framework
- Patient profile (PP)
- Chief complaint (CC)
- History of the present illness (HPI)
- Past medical history (PMH)
- Allergies
- Drug history
- Alcohol
- Smoking
- Family history (FH)
- Social History (SH)
- Occupational History
- Review of Systems (ROS)
There are many situations in which the patient may be unable to give a history e.g.,
- Unconscious,
- Delirious,
- Demented, or
- Dysphasic.
In these situations, you should make an effort to speak to all who can help you fill in the gaps—regarding not only what happened to the patient but also their usual medication, functional state, living arrangements, and so on.
When taking a history from a source other than the patient, be sure to document clearly that this is the case and the reason(s) for the patient being unable to speak for themselves.
Useful sources of information include the following:
- Relatives, guardians, and cohabitants
- Close friends and roommates
- Primary care physician (PCP) or other members of the primary care team
- Pharmacist
- Staff at the nursing home or residential or other facility
- Ambulance personnel
- Anyone who witnessed the event.
Patient profile (PP)
This is the essential identifying and biographic information required by the facility.
Typically included in the PP will be the patient’s name, address, and DOB.
Other information included in the PP may include:
- Age
- Religion
- Nationality
- Marital status
Contact information as requested by the individual facility
Chief complaint (CC)
This is the patient’s chief symptom(s) in their own words.
It should generally be no more than a single sentence.
If the patient has several symptoms, present them as a list that you can expand on later in the history.
Ask the patient an open question, such as:
- “What’s the problem?”
- “What made you come to the office?”
Each provider will have their own style.
You should choose a phrase that suits you and your manner (one of the authors favors saying.
E.g. “tell me the story”, after a brief introduction.
The question “What brought you here?” usually brings the response “an ambulance,” “my feet,” or “the taxi”—each patient being under the impression that they are the first to crack this joke. This question is thus best avoided.
Remember, the CC is expressed in the patient’s words. “Hemoptysis” is rarely a presenting complaint, but “coughing up blood” may well be!
NB: This initial part of the history is particularly important and highly dependent on the skill of the doctor. It is very tempting to interrupt too early, but once interrupted the patient rarely completes what they were intending to say. Even when they appear to have finished giving their reasons for the consultation, always ask if there are any more broad areas that still need discussion, before beginning to discuss each in more detail.
History of the presenting illness (HPI)
Here you are asking about and documenting details of the presenting complaint.
By the end of taking the HPI, you and readers of the record should have a clear idea about:
The nature of the problem and of exactly how and when it started,
How the problem has progressed over time
What impact it has had on the patient in their general physical health, psychology, and social and working lives
What remedies, including earlier medical interventions received
The HPI is best tackled in two phases.
Phase I
Ask an open question (as for the CC) and allow the patient to talk through what has happened for about 2 minutes. Don’t interrupt!
Encourage the patient with nonverbal responses and take discreet notes.
This allows you to make an initial assessment of the patient in terms of:
Education level
Personality, and
Anxiety.
Using this information, you can adjust your responses and interaction. It should also become clear to you exactly what symptom the patient is most concerned about.
Second phase
In the second phase, you should revisit the whole story, asking more detailed questions.
It may be useful to say, “I’d just like to go through the story again, clarifying some details.”
This is your chance to verify time-lines and the relation of one symptom to another. You should also clarify pseudo- medical terms (e.g., exactly what does the patient mean by “vertigo,” “flu,” or “rheumatism”?).
Remember, this should feel like a conversation, not an interrogation!
For each symptom, determine
The exact nature of the symptom
- The onset
- Date it began
- How it began (e.g., suddenly, gradually—over how long?)
- If the symptom is long- standing, why is the patient seeking help now?
- Previous occurrences and frequency
- Is the symptom constant or intermittent?
- How long does it last each time?
- What is the exact manner in which it comes and goes?
- Change over time
- Is it improving or deteriorating?
- Exacerbating factors
- What makes the symptom worse?
- Relieving factors
- What makes the symptom better?
- Associated symptoms
- For pain, determine:
- Site (where is the pain worst—ask the patient to point to the site with one finger)
- Radiation (does the pain move anywhere else?)
- Character (i.e., dull, aching, stabbing, burning)
- Severity (scored out of 10, with 10 being the worst pain imaginable)
- Mode and rate of onset (how did it come on—over how long?)
- Duration
- Frequency
- Exacerbating factors
- Relieving factors
- Associated symptoms (e.g., nausea, dyspepsia, shortness of breath)
A mnemonic for remembering the important factors in analyzing pain or a symptom is O3PQRST. It includes the significant factors:
Onset, Previous occurrences, Provoking factors, Palliative factors (including prescribed and home treatments attempted), Quality (such as characteristics of pain), Radiation (site of onset and any radiation), Severity, and Timing
If the symptom is long-standing, ask why the patient is seeking help now.
Has anything changed?
It is often useful to ask when the patient was last well.
This may help focus their mind on the start of the problem, which may seem distant and less important to them.
Some aspects of the patient’s past illnesses or diagnoses may have already been covered.
Here, you should obtain detailed information about past illnesses and surgical procedures.
Ask the patient if they are receiving care for anything else or have ever been to the hospital before.
Ensure that you get dates and a location for each event.
Click here to access Unit one Content..
Topic 2:HISTORY TAKING (Cont')
For each condition, ask the following:
- When was it diagnosed?
- How was it diagnosed?
- How has it been treated?
- For operations, ask about any previous anesthesia problems.
- Ask about immunizations.
- Have the patient provide as many specifics about types and dates of immunizations.
- Also ask about employment and insurance examinations.
Specific conditions to include in PMH
- Diabetes
- Rheumatic fever
- Jaundice
- Hypercholesterolemia
- Hypertension
- Angina
- Myocardial infarction (MI)
- Stroke or transient ischemic attack (TIA)
- Asthma
- Tuberculosis (TB)
- Epilepsy
- Anesthetic problems
- Blood transfusions
- Childhood illnesses and sequelae
Don’t take anything for granted!
For each condition that the patient reports having, ask exactly how it was diagnosed (where? by whom?) and how it has been treated since then.
For example:
If the patient reports “asthma,” ask;
- Who made the diagnosis
- When the diagnosis was made,
- If they have ever had lung function tests
- If they have ever seen a pulmonologist, and
- If they are taking any inhalers.
- Have they used any over-the-counter (OTC) treatments or alternative medications?
Occasionally, patients will give a long-standing symptom a medical name, which can be very confusing. In this example, the patient’s “asthma” could be how they refer to their wheeze that is due to congestive cardiac failure.
Any allergies should be documented separately from the drug history because of their importance.
Ask if the patient has any allergies or is allergic to anything if they are unfamiliar with the term allergies .
Be sure to probe carefully, as people will often tell you about their hay fever and forget about the rash they had when they took penicillin.
Ask specifically if they have had any reactions to drugs or medication; don’t forget to inquire about food or environmental allergies.
If an allergy is reported, you should obtain the exact nature of the event and decide if the patient is describing a true allergy, intolerance, or simply an unpleasant side effect.
Here you should list all the medications that the patient is taking, including the dosage and frequency of each prescription.
If the patient is unsure about their medications, confirm the drug history with the prescribing provider or pharmacy.
Take special note of any drugs that have been started or stopped recently.
You should also ask about compliance—does the patient know what dose they take? Do they ever miss doses? If they are not taking the medication, what’s the reason? Do they have any compliance aids such as a pre-packaged weekly supply?
It may also be valuable to ask if the patient is having any difficulty obtaining their medications.
The patient may consider some medications as not being drugs,
so specific questioning is required. Don’t forget to ask about the following:
Eye drops
Inhalers
Sleeping pills
Oral contraception
OTC drugs (bought at a store or pharmacy), vitamin supplements
Herbal remedies
Illicit or “recreational” drug use
You should attempt to quantify, as accurately as possible, the amount of alcohol consumed per week, and establish if the consumption is spread out evenly over the week or concentrated in a smaller period.
The CAGE questionnaire, long considered a standard in alcohol assessment, may be supplemented or possibly replaced by use of a single question: “How many times in the past year have you had X or more drinks in a day?,” where X is 5 for men and 4 for women, and a response of 1 or more times has been validated and may prove to be valuable with certain populations
In the United States and many European countries, alcohol is quantified as standard drinks. In the United States, a standard drink contains 0.54 ounces of alcohol.
Healthy People 2010 reports that males may be at risk for alcohol related problems if they drink more than 14 drinks per week or more than 4 drinks per occasion.
Likewise, females may be at risk if they drink more than seven drinks per week or three drinks per occasion.
For typical strength alcoholic beverages the following contain approximately 0.54 ounces of ethanol:
12 ounces beer
5 ounces of wine
1.5 ounces of 80 proof distilled spirits
d)Smoking
Attempt to quantify the habit in pack-years:
1 pack-year is 20 cigarettes (1 pack) per day for 1 year (e.g., 40/day for 1 year = 2 pack years;
10/day for 2 years = 1 pack-year).
Ask about previous smoking, as many patients will call themselves nonsmokers if they gave up yesterday or are even on their way to the hospital or clinic!
Remember to ask about passive smoking. An inquiry such as, “Do you smoke in your house, in your car, or around your children?” may help to raise consciousness regarding health risks for children and the issue of influencing the child’s future behavior.
Be aware of cultural issues—smoking is forbidden for Sikhs, for example, and they may take offence at the suggestion of smoking!
Family history (FH)
The FH details the following:
Makeup of the family, including age and gender of parents, siblings, children, and extended family, as relevant
Health of the family
You should ask about any diagnosed conditions in other living family members. Stating a “laundry list” of common conditions will help the patient understand conditions that you are most concerned about.
You should also document the age and cause of death for all deceased first-degree relatives and for other family members if you feel it is appropriate.
It may help to draw a family tree (genogram).
These diagrams are particularly useful in pediatric assessments, families with multiple health problems that demonstrate familial propensities, and families with hereditary conditions.
Social history (SH)
This is your chance to document the details of the patient’s personal life that are relevant to:
The working diagnosis,
The patient’s general well-being, and
The recovery or convalescence
The SH will help in understanding the impact of the illness on the patient’s functional status.
This is a vital part of the history but is often given only brief attention.
The disease and, indeed, the patient do not exist in a vacuum but are part of a community that they interact with and contribute to. Without these details, it is impossible to take a holistic approach to the patient’s wellbeing.
Establish the following in the social history:
- Marital status
- Sexual orientation
- Occupation (or previous occupations if retired)
- You should establish the exact nature of the job if it is unclear—does it involve sitting at a desk, carrying heavy loads, or traveling?
- Other people who live at the same address
- Type of accommodation (e.g., house, apartment—and on what floor)
- Does the patient own their accommodation or rent it?
- Are there any stairs? How many?
- Does the patient have any aids or adaptations in their house (e.g., rails near the bath)?
- Does the patient use any walking aids (e.g., cane, walker, scooter)?
- Does the patient receive any help on a daily basis?
- Who from (e.g., family, friends, social services)?
- Who does the laundry, cleaning, cooking, and shopping?
- Does the patient have relatives living nearby?
- What hobbies does the patient have?
- Does the patient own any pets?
- Has the patient been abroad recently or spent any time abroad in the past?
- Does the patient drive?
Click here to access Unit one Content..
Topic 2:HISTORY TAKING (Review of systems)
Review of systems (ROS)
Ask the patient if they have any of the following symptoms:
General symptoms
Weight change (loss or gain), change in appetite (loss or gain), fever, lethargy, malaise
Skin symptoms
Lumps, bumps, sores, ulcers, rashes, itch
Sensory symptoms
Vision problems hearing deficits
Respiratory symptoms
Cough, sputum, hemoptysis, shortness of breath, wheeze, chest pain
Cardiovascular symptoms
Shortness of breath on exertion, paroxysmal nocturnal dyspnea, chest pain, palpitations, ankle swelling, orthopnea, claudication
Gastrointestinal symptoms
Dysphagia, indigestion, abdominal pain, nausea, vomiting, a change in bowel habit, constipation, diarrhea, rectal blood loss
Genitourinary symptoms
Urinary frequency, polyuria, dysuria, hematuria, nocturia, menstrual, problems, impotence, urgency, post- micturition dribbling, retrograde ejaculation
Neurological symptoms
Headaches, dizziness, tingling, weakness, tremor, faint, seizures, convulsions, epilepsy, blackouts or other loss of consciousness
Psychological symptoms
Depression, anxiety, sleep disturbances
Endocrine symptoms
Intolerance to heat or cold
Musculoskeletal symptoms
Aches, pains, stiffness, swelling
The elderly patient
Obtaining a history from older people might be regarded as no greater task than that for any other patient; however, cognitive decline, deafness, and acute illness can make this difficult.
Taking a good history from older people is a skill that you will find useful in all other situations.
While the history is key for making diagnoses, it is also an opportunity for much more—your first interaction with an older patient sets important first impressions.
A skillful history not only reaps diagnostic rewards but also marks you as a competent provider who can gain trust, reassure, and communicate well with patients in any challenging situation.
Key points when handling elderly patients;
- Learn to listen
- It can be tempting to ask lots of questions to obtain every fact in the history, particularly if you are rushed.
- Doing this will not only frustrate and offend your patient (because you clearly don’t listen) but will also risk your missing important facts.
- Instead, learn to stay quiet—and listen in detail to the history of the presenting complaint, which may only be 3–4 minutes, but gives your patient a chance to be heard.
- Seemingly irrelevant detail is often useful when patients have the chance to put it in context. It often saves you time, as other key information may emerge, and you can better focus the history.
Problem lists
Patients with chronic illness or multiple diagnoses may have more than one strand to their acute presentation.
Consider breaking the history of the presenting complaint down into a problem list, e.g.,
This can often reveal key interactions between diagnoses that you might not have thought about.
Drug history in the elderly;
Remember to consider polypharmacy and that patients may not remember all the treatments they take.
Be aware that more drugs mean more side effects and less compliance, so ask which are taken and why—(older) people are often quite honest about why they omit tablets.
Many elderly individuals use supplements or alternative remedies that may interfere with your prescribed treatments, so ask about them! Eye drops, sleeping pills, and laxatives are often regarded non-medicines by patients, so be thorough and ask about each separately.
Avoid precipitating delirium due to acute withdrawal of benzodiazepines.
Finally, remember the cost of medications and the impact they have on an individual on a fixed income.
Click here to access Unit one Content..
Topic 2:HISTORY TAKING (Review of systems)- Cont'
Functional history in the elderly;
A comprehensive functional history is a cornerstone of your history-taking in older people— You deserve no apologies for being reminded over and over about this throughout clinical methods lessons.
Diseases may not cured or modified, but their key component—the effects on patients and their lives—might be easily transformed through manipulation of activities of daily living.
Remember to ask about support systems for the patient at home—have things resulted in a crisis for the patient because a caregiver is ill? Be polite and ask tactfully about finances and available services. Are social service benefits, such as home health and meals-on-wheels, available?
Many patients do not realize that they might be eligible, so precede your questions with an explanation that, if desired, information about resources or referral may be provided.
Social history in the elderly;
SH is exactly that and should complement the functional history.
Occupation (other than retired) can be of value when one is faced with a new diagnosis of pulmonary fibrosis or bladder cancer and may give your patient a chance to sketch out more about their lives. Inquire about family—don’t assume that a relative may be able to provide help, as they may live far away; the patient may still have a spouse, but be separated.
Chat with patients about their daily lives—interests and pursuits can help distract an ill patient, give hope for the future, and act as an incentive for recovery and meaningful rehabilitation.
The pediatric patient
Obtaining a history about or from children may present additional challenges, depending on who is available to provide the history and how active the child is.
Key points in the paediatric patient;
- Learn to listen
- Remember to listen to the child in addition to the caregiver. Again, it can be tempting to ask lots of questions to obtain every fact in the history.
- Doing this may result in missed opportunities to observe the patient– caregiver interaction.
- The child who is given appropriate attention during the history may feel more engaged and be more cooperative during the exam. Instead of having the child be quiet, remember to solicit the input of your youthful patient.
- It gives them a chance to be heard. It can even save time, as key information may emerge from the unexpected source—the child.
Drug history in the paediatric patient;
Remember that parental practices may put children at risk. Ask about the use of OTC medications and alternative treatments. This is often an overlooked area when dealing with children.
Social history in the paediatric patient;
Don’t assume that a relative bringing the child in for an exam may be able to provide all the needed information.
The child may be the subject of a shared-custody agreement, or the noncustodial parent, who has minimal information about the child, may be bringing the child in. Remember to ask about formal and informal support for the patient and family during illness.
Ask tactfully about the availability of parental benefits, including sick time.
Chat with the child about their daily activities.
Garrulous Patient
- Patient is incapable of giving short simple answers
- Gives endless and inappropriate details
- Digress and repeat themselves
- May behave in such a manner due to obsession personality or anxiety therefore you should guide them politely without causing offence.
The Well-informed Patient
The Well-informed Patient
Twenty or more years ago doctors often looked after patients for a long time without really explaining their illness to them, and patients were reasonably happy about this, taking the attitude that 'the doctor knows best'.
This approach is now unacceptable, and the doctor must give the patient as much information about their illness as possible, particularly so that they can make informed choices about treatments.
This change of approach has led to many patients seeking information about their problems from other sources, particularly the Internet.
The doctor must take all this in their stride, go through the information with the patient, and help them by showing what is relevant and what is not.
In general it is much easier and more rewarding to look after well-informed patients, provided they do not fall into the very small group who have such fixed and erroneous ideas about their problems that the diagnostic and treatment process is impeded.
Click here to access Unit one Content..
Topic 2:Summary
- During systemic review, the affected system(s) should be reviewed in the history of presenting illness.
- All other systems not mentioned in the history are reviewed in the review of systems section.
Click here to access Unit one Content..
Topic 2:References
- Glynn, M., Deake, W. M., and Hutchson R., (2012). Hutchison’s Clinical Methods: An integrated Approach to clinical practice. Edinburgh Elsevier latest edition.
- Houghton A.R, Gray D. and Chamberlain, E.R. (2010). Chamberlains Clinical signs and symptoms in Clinical Medicine. London, Hodder Arnold.
Click here to access Unit one Content..
Topic 3: GENERAL EXAMINATION AND VITAL SIGNS
Vital Signs
Vital signs include the measurement of: temperature, respiratory rate, pulse, blood pressure and, where appropriate, blood oxygen saturation. These numbers provide critical information (hence the name "vital") about a patient's state of health. In particular, they:
- Can identify the existence of an acute medical problem.
- Are a means of rapidly quantifying the magnitude of an illness and how well the body is coping with the resultant physiologic stress. The more deranged the vitals, the sicker the patient.
- Are a marker of chronic disease states (e.g. hypertension is defined as chronically elevated blood pressure).
Most patients will have had their vital signs measured by an RN or health care assistant before you have a chance to see them. However, these values are of such great importance that you should get in the habit of repeating them yourself, particularly if you are going to use these values as the basis for management decisions. This not only allows you to practice obtaining vital signs but provides an opportunity to verify their accuracy. As noted below, there is significant potential for measurement error, so repeat determinations can provide critical information.
Getting Started: The examination room should be quiet, warm and well lit. After you have finished interviewing the patient, provide them with a gown (a.k.a. "Johnny") and leave the room (or draw a separating curtain) while they change. Instruct them to remove all of their clothing (except for briefs) and put on the gown so that the opening is in the rear. Occasionally, patient's will end up using them as ponchos, capes or in other creative ways. While this may make for a more attractive ensemble it will also, unfortunately, interfere with your ability to perform an examination! Prior to measuring vital signs, the patient should have had the opportunity to sit for approximately five minutes so that the values are not affected by the exertion required to walk to the exam room. All measurements are made while the patient is seated.
Observation: Before diving in, take a minute or so to look at the patient in their entirety, making your observations, if possible, from an out-of-the way perch. Does the patient seem anxious, in pain, upset? What about their dress and hygiene? Remember, the exam begins as soon as you lay eyes on the patient.
Temperature: This is generally obtained using an oral thermometer that provides a digital reading when the sensor is placed under the patient's tongue. As most exam rooms do not have thermometers, it is not necessary to repeat this measurement unless, of course, the recorded value seems discordant with the patient's clinical condition (e.g. they feel hot but reportedly have no fever or vice versa). Depending on the bias of a particular institution, temperature is measured in either Celcius or Farenheit. The normal temperature range is 35.5-37.5 degrees celcius. Rectal temperatures, which most closely reflect internal or core values, are approximately 0.5 degree C higher than those obtained orally.
Respiratory Rate: Respirations are recorded as breaths per minute. They should be counted for at least 30 seconds as the total number of breaths in a 15 second period is rather small and any miscounting can result in rather large errors when multiplied by 4. Try to do this as surreptitiously as possible so that the patient does not consciously alter their rate of breathing. This can be done by observing the rise and fall of the patient's hospital gown while you appear to be taking their pulse. Normal is between 12 and 20. In general, this measurement offers no relevant information for the routine examination. However, particularly in the setting of cardio-pulmonary illness, it can be a very reliable marker of disease activity.
Pulse: This can be measured at any place where there is a large artery (e.g. carotid, femoral, or simply by listening over the heart), though for the sake of convenience it is generally done by palpating the radial impulse. You may find it helpful to feel both radial arteries simultaneously, doubling the sensory input and helping to insure the accuracy of your measurements. Place the tips of your index and middle fingers just proximal to the patients wrist on the thumb side, orienting them so that they are both over the length of the vessel.
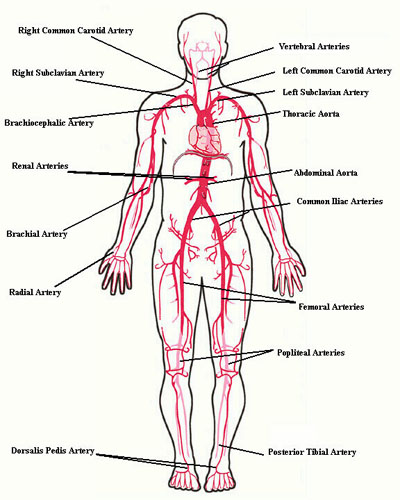
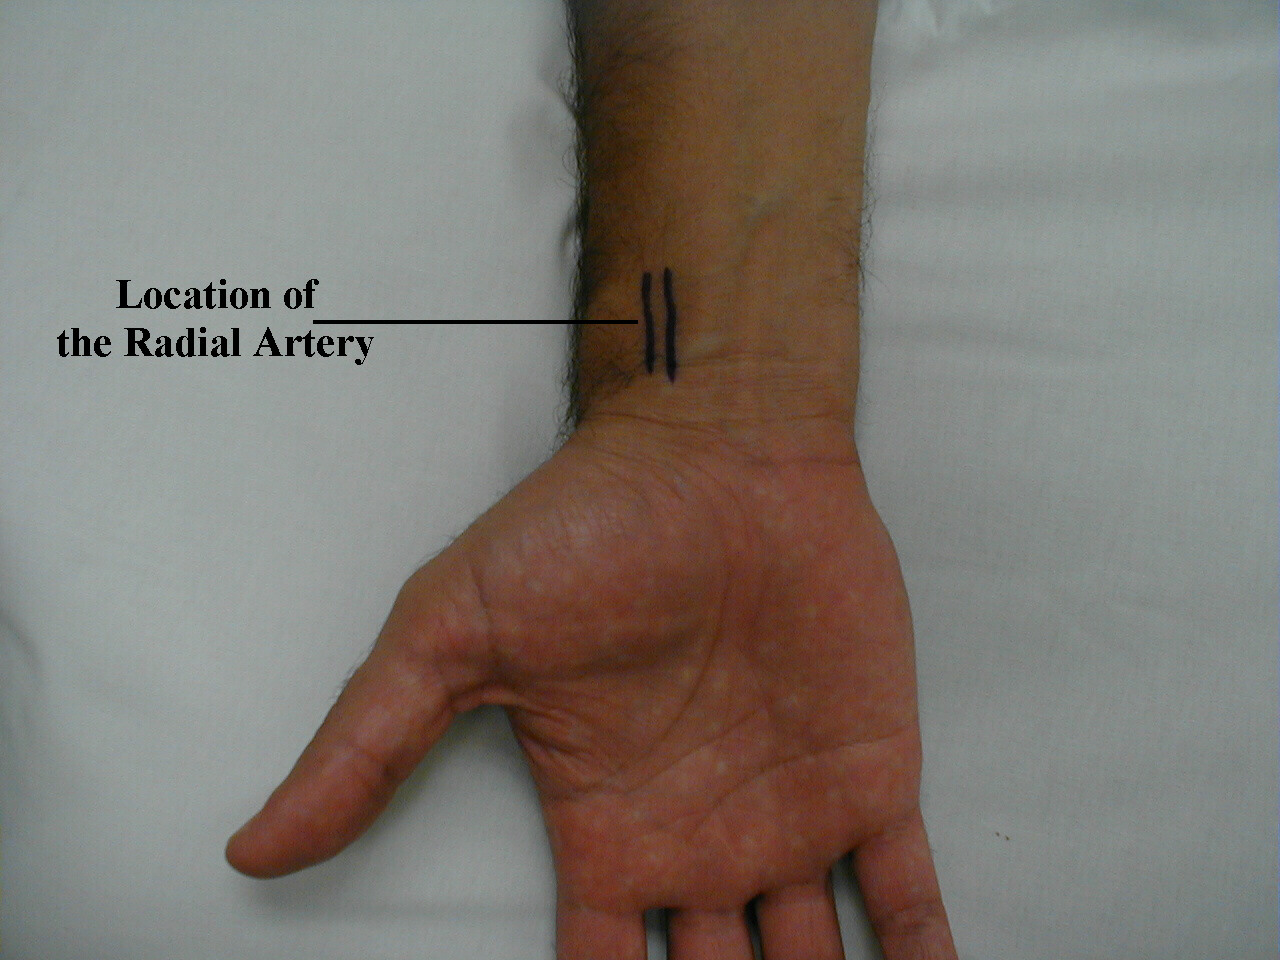
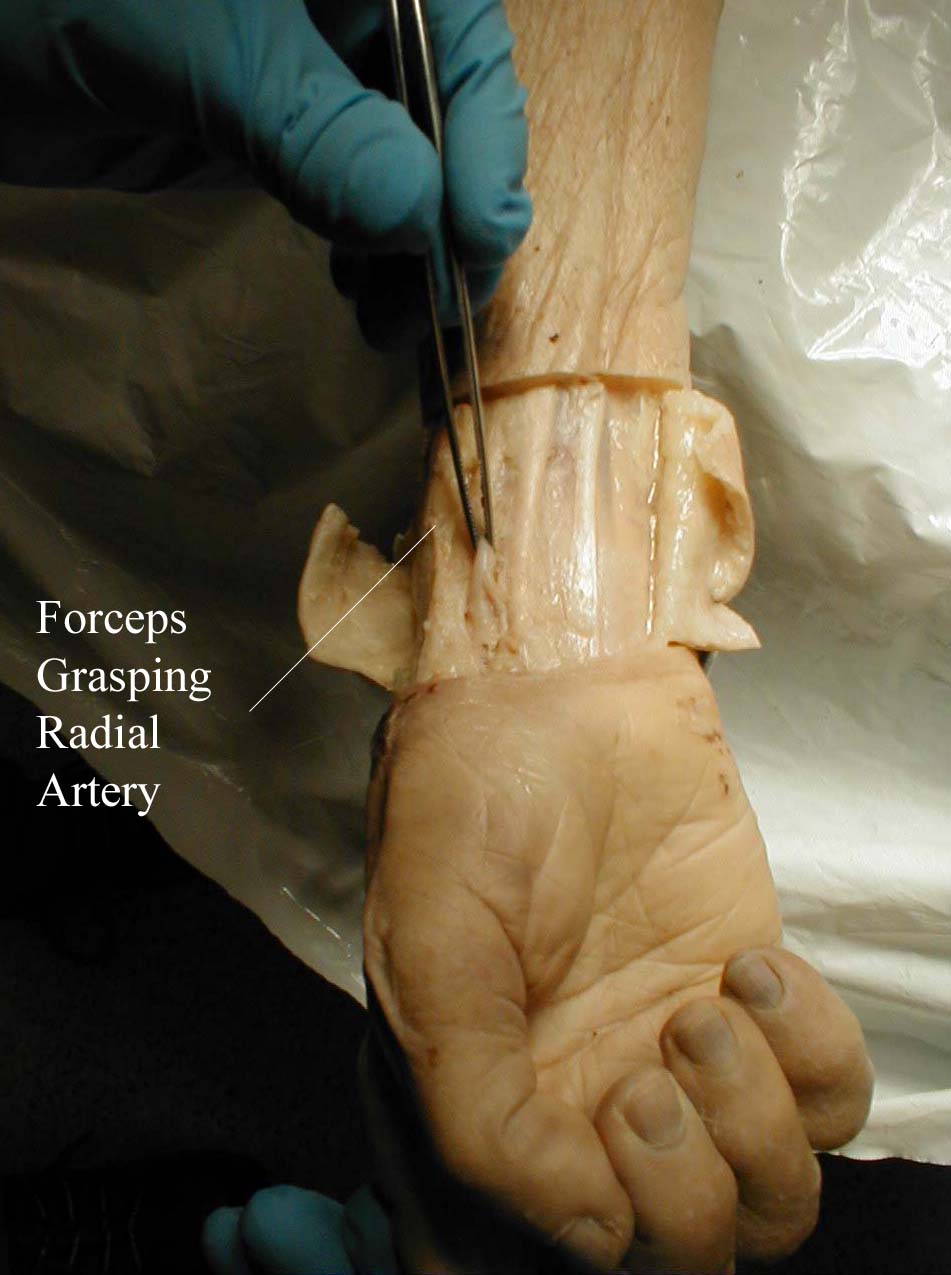
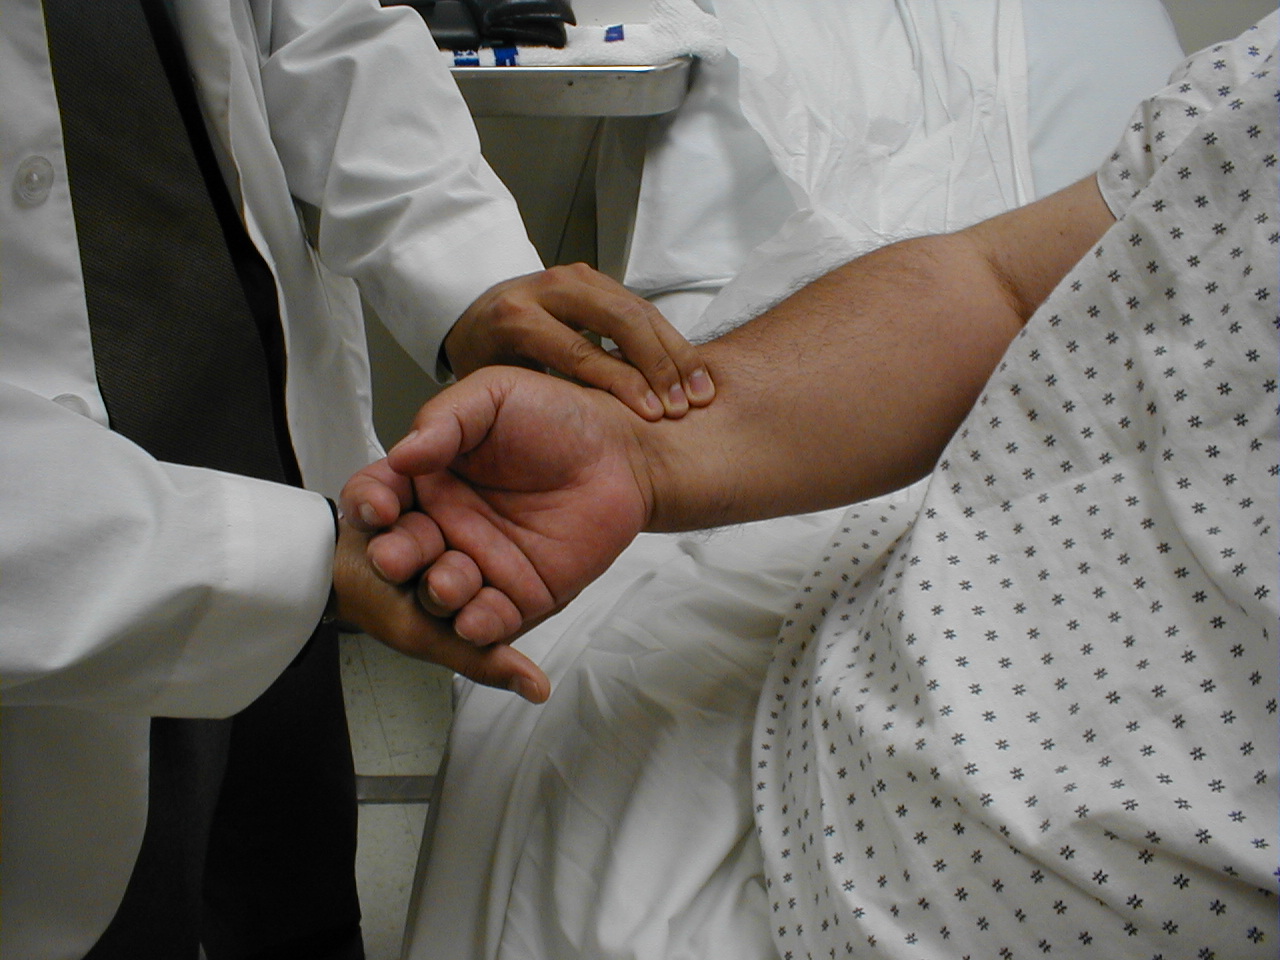
Frequently, you can see transmitted pulsations on careful visual inspection of this region, which may help in locating this artery. Upper extremity peripheral vascular disease is relatively uncommon, so the radial artery should be readily palpable in most patients. Push lightly at first, adding pressure if there is a lot of subcutaneous fat or you are unable to detect a pulse. If you push too hard, you might occlude the vessel and mistake your own pulse for that of the patient. During palpation, note the following:
- Quantity: Measure the rate of the pulse (recorded in beats per minute). Count for 30 seconds and multiply by 2 (or 15 seconds x 4). If the rate is particularly slow or fast, it is probably best to measure for a full 60 seconds in order to minimize the impact of any error in recording over shorter periods of time. Normal is between 60 and 100.
- Regularity: Is the time between beats constant? In the normal setting, the heart rate should appear metronomic. Irregular rhythms, however, are quite common. If the pattern is entirely chaotic with no discernable pattern, it is referred to as irregularly irregular and likely represents atrial fibrillation. Extra beats can also be added into the normal pattern, in which case the rhythm is described as regularly irregular. This may occur, for example, when impulses originating from the ventricle are interposed at regular junctures on the normal rhythm. If the pulse is irregular, it's a good idea to verify the rate by listening over the heart (see cardiac exam section). This is because certain rhythm disturbances do not allow adequate ventricular filling with each beat. The resultant systole may generate a rather small stroke volume whose impulse is not palpable in the periphery.
- Volume: Does the pulse volume (i.e. the subjective sense of fullness) feel normal? This reflects changes in stroke volume. In the setting of hypovolemia, for example, the pulse volume is relatively low (aka weak or thready). There may even be beat to beat variation in the volume, occurring occasionally with systolic heart failure.
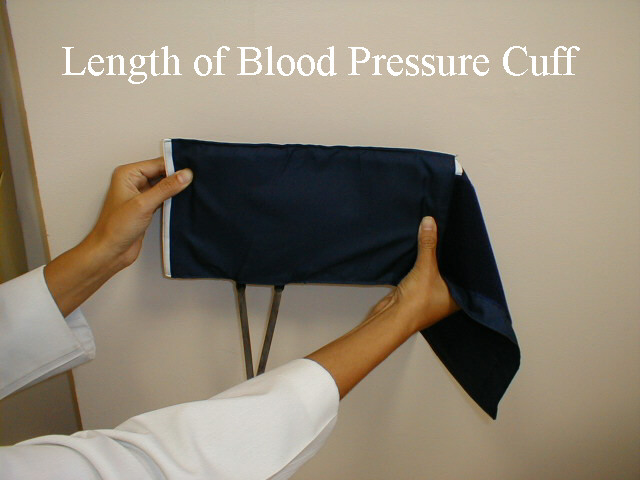
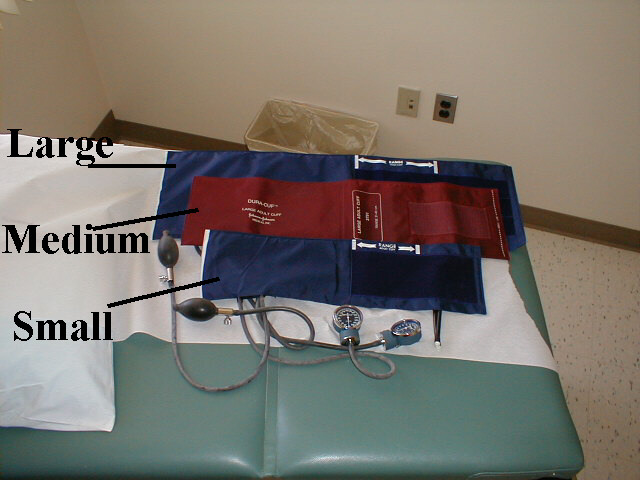
Blood Pressure: Blood pressure (BP) is typically measured using an anaeroid manometer, with readings reported in millimeters of mercury (mm Hg). While most BP readings in hospitals and clinics are initially taken with digital machines, it's still relevant to learn how to use manual cuffs, as clinicians will need to check the validity of digital readings on occasion (e.g. when BP unexpectedly high or low). The size of the BP cuff will affect the accuracy of these readings. The inflatable bladder, which can be felt through the vinyl covering of the cuff, should reach roughly 80% around the circumference of the arm while its width should cover roughly 40%. If it is too small, the readings will be artificially elevated. The opposite occurs if the cuff is too large. Clinics should have at least 2 cuff sizes available, normal and large. Try to use the one that is most appropriate, recognizing that there will rarely be a perfect fit.
Click here to access Unit one Content..
Topic 3: GENERAL EXAMINATION AND VITAL SIGNS (Cont')
Blood Pressure Cuffs
In order to measure the BP, proceed as follows:
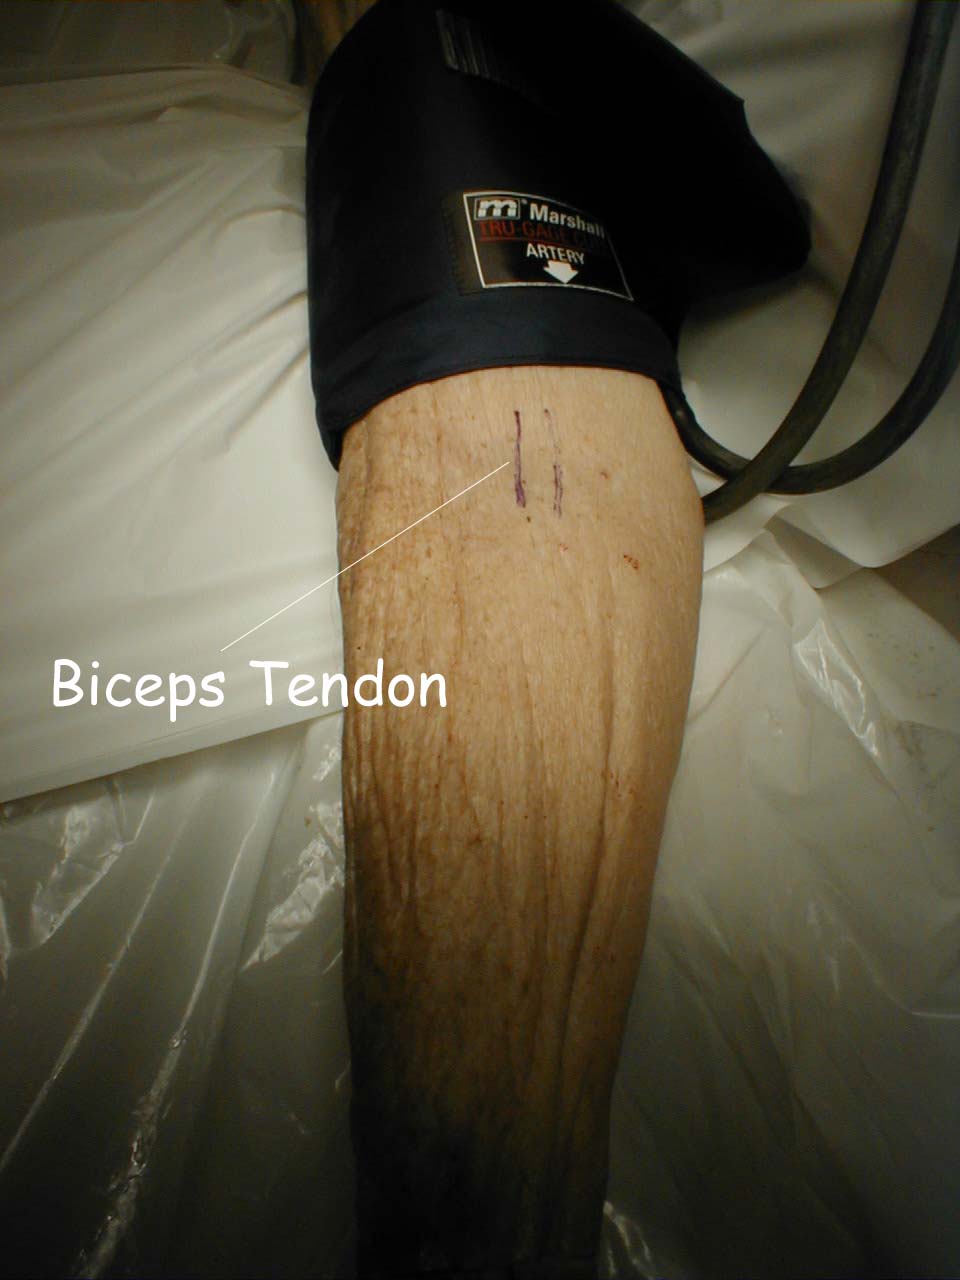
- The patient should be seated, ideally resting for 5 minutes prior to measuring their blood pressure. Legs should be uncrossed, feet placed flat on the floor.Antecubital Fossa
The pictures below demonstrate the antecubital fossa anatomy (surface anatomy on the left, gross anatomy on the right).

- The cuff should be placed directly on the skin (i.e. do not put it over clothes). Sliding a loose fitting t-shirt up so that the skin is exposed is fine. However, try not to roll tight fitting shirts up over the bicep. In that setting, it’s better to have the patient take their shirt off (using a gown to keep the rest of their body covered).
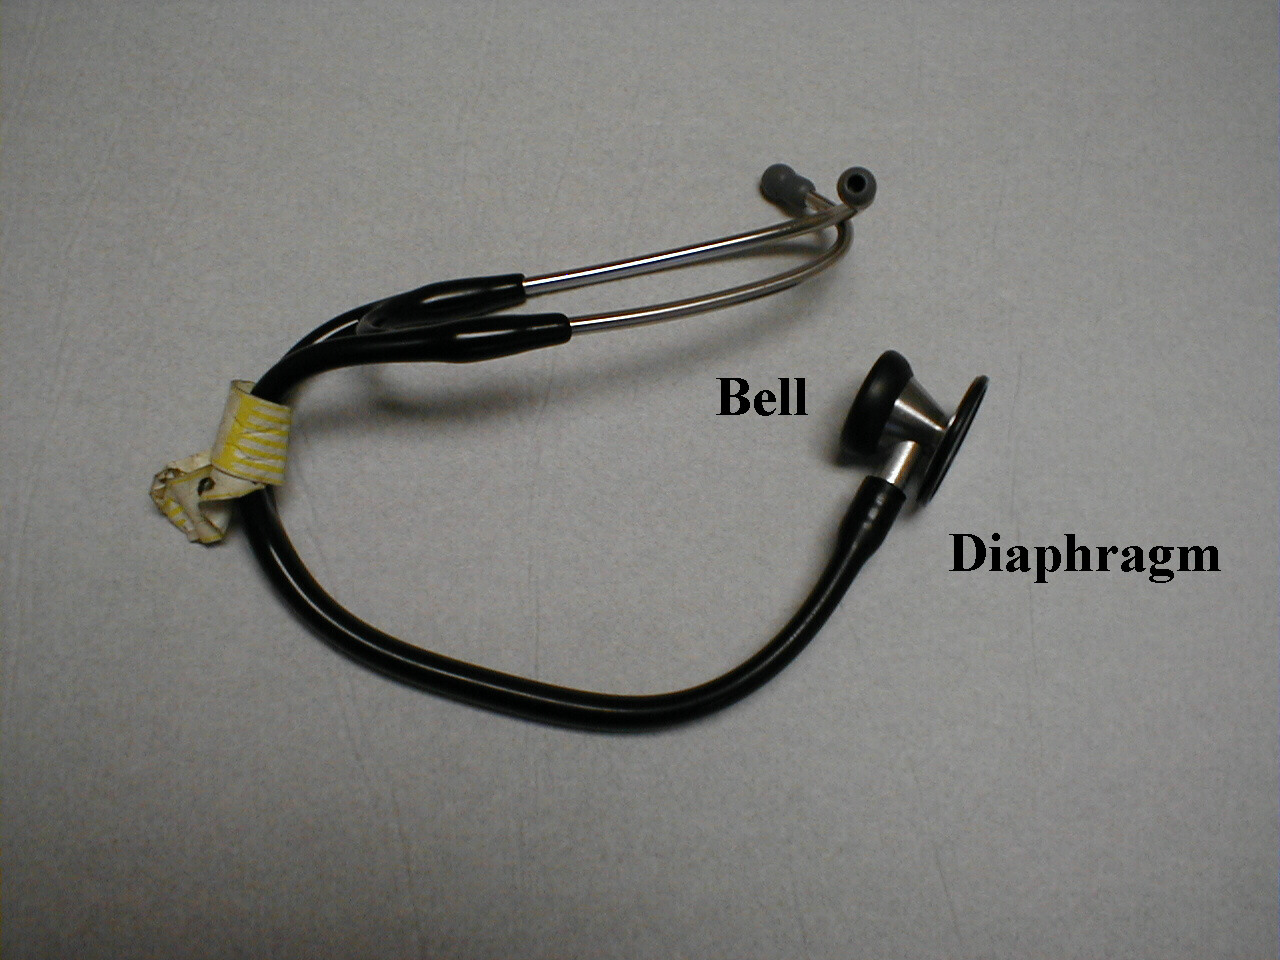
- Wrap the cuff around the patient's upper arm so that the line marked "artery" is roughly over the brachial artery, located towards the medial aspect of the antecubital fossa (i.e. the crook on the inside of their elbow). The placement does not have to be exact nor do you actually need to identify this artery by palpation.
- Turn the valve on the pumping bulb clockwise (may be counter clockwise in some cuffs) until it no longer moves. This is the position which allows air to enter and remain in the bladder.
- Hold the bell in place with your left hand. Use your right hand to pump the bulb until you have generated 150 mmHg on the manometer. This is a bit above the top end of normal for systolic blood pressure (SBP). Then listen. If you immediately hear sound, you have underestimated the SBP. Pump up an additional 20 mmHg and repeat. Now slowly deflate the blood pressure cuff (i.e. a few mm Hg per second) by turning the valve in a counter-clockwise direction while listening over the brachial artery and watching the pressure gauge. The first sound that you hear reflects the flow of blood through the no longer completely occluded brachial artery. The value on the manometer at this moment is the SBP. Note that although the needle may oscillate prior to this time, it is the sound of blood flow that indicates the SBP.
- Continue listening while you slowly deflate the cuff. The diastolic blood pressure (DBP) is measured when the sound completely disappears. This is the point when the pressure within the vessel is greater then that supplied by the cuff, allowing the free flow of blood without turbulence and thus no audible sound. These are known as the Sounds of Korotkoff.Technique for Measuring Blood Pressure
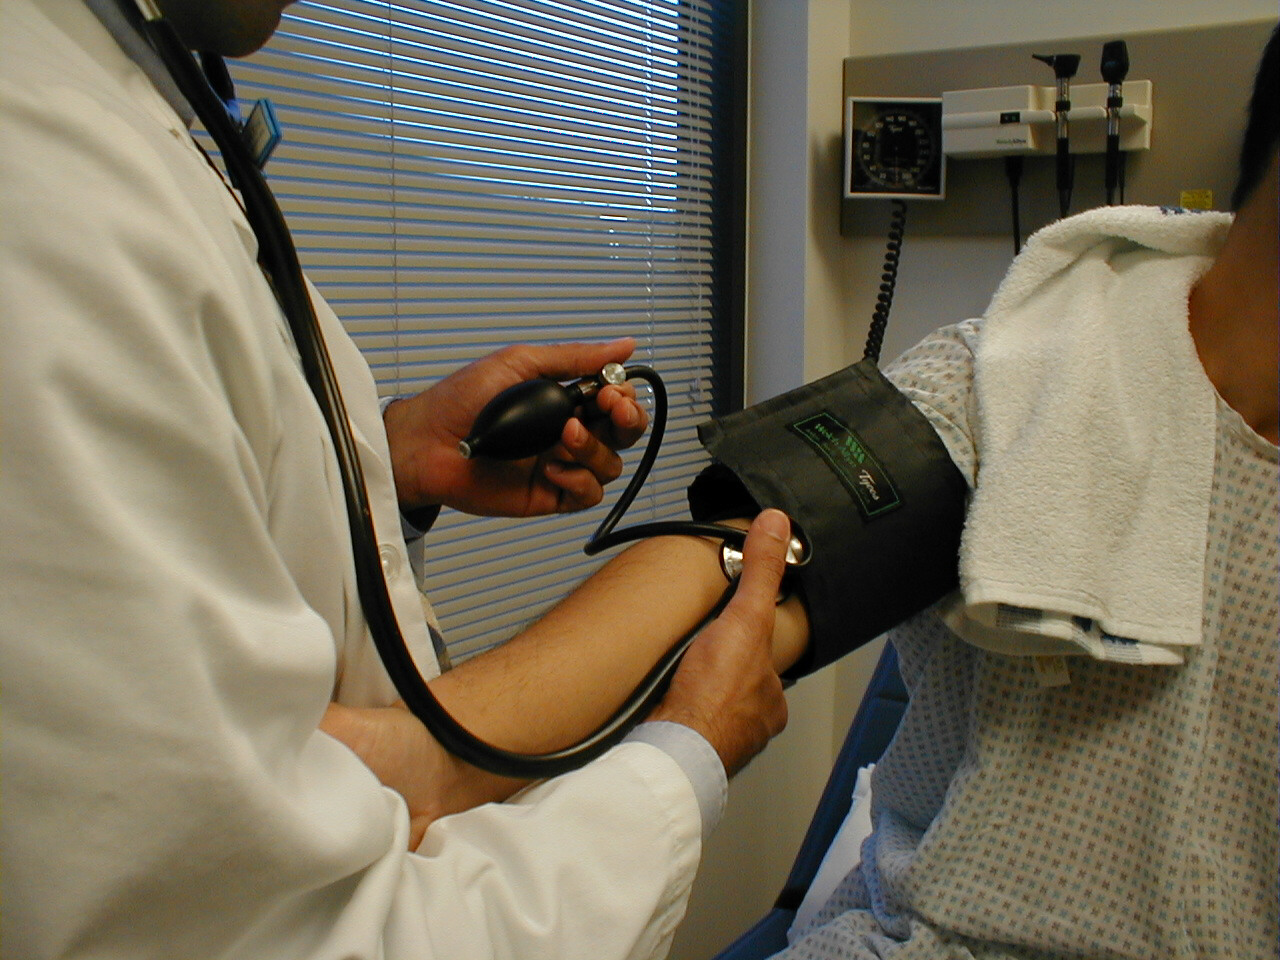
- Repeat the measurement on the patient's other arm, reversing the position of your hands. The two readings should be within 10-15 mm Hg of each other. Differences greater than this imply that there is differential blood flow to each arm, which most frequently occurs in the setting of subclavian artery atherosclerosis.
- Occasionally you will be unsure as to the point where systole or diastole occurred and wish to repeat the measurement. Ideally, you should allow the cuff to completely deflate, permit any venous congestion in the arm to resolve (which otherwise may lead to inaccurate measurements), and then repeat a minute or so later. Furthermore, while no one has ever lost a limb secondary to BP cuff induced ischemia, repeated measurement can be uncomfortable for the patient, another good reason for giving the arm a break.
- Avoid moving your hands or the head of the stethescope while you are taking readings as this may produce noise that can obscure the Sounds of Koratkoff.
- You can verify the SBP by palpation. To do this, position the patient's right arm as described above. Place the index and middle fingers of your right hand over the radial artery. Inflate the cuff until you can no longer feel the pulse, or simply to a value 10 points above the SBP as determined by auscultation. Slowly deflate the cuff until you can again detect a radial pulse and note the reading on the manometer. This is the SBP and should be the same as the value determined with the use of your stethescope.
Implications, interpretation and other clinical pearls related to hypertension:
Hypertension is a common disease, affecting > 40% of the adult US population. With the steady increase in obesity rates, it’s anticipated that this % will continue to increase.
Normal values and definitions for hypertension are as follows:
- Normal < 120/80 mm Hg
- Elevated: SBP 120-129 and DBP < 80 mm Hg
- Stage I hypertension: SBP 130-39 or DBP 80-89 mm Hg
- Stage II hypertension: SBP >= 140 or DBP >= 90 mm Hg
The diagnosis of hypertension is typically based on 2 readings, done at 2 different settings. A one-time measurement > 160/100 should prompt consideration for treatment. Home readings (with a validated device) can also be used for the diagnosis and management of hypertension. Careful attention must be paid to the use of appropriate techniques (described above), as measurement error(s) can lead to inaccurate values and diagnoses.
Hypertension (HTN) causes and accelerates the progression of: Coronary artery disease, heart failure with reduced ejection fraction (HFrEF), heart failure with preserved ejection fraction (HFpEF), left ventricular hypertrophy, aortic aneurysm development, peripheral arterial disease, stroke, chronic kidney disease, and retinopathy. The risk of HTN induced damage correlates with both the height of BP and the chronicity of elevation (i.e. longer and higher is worse).
The treatment of HTN prior to the development of Target Organ Damage (a.k.a. TOD) is referred to as "primary prevention," while treatment to prevent and/or slow progression once disease has already been established is called "secondary prevention." Evaluation of patients with HTN requires careful history taking, physical exam, labs, and other studies to search for co-morbid problems (e.g. diabetes, sleep apnea, etc.) and/or occult TOD. Most patients with HTN are asymptomatic, at least until they develop target organ damage, which can take years to manifest.
Click here to access Unit one Content..
Topic 3 1: Summary
- During general examination of a patient, you should start with the general parameters namely; jaundice, pallor, lymphadenopathy, cyanosis, finger clubbing, oral thrush, dehydration and oedema.
- The general examination starts after the vital signs are taken.
Click here to access Unit one Content..
Topic 3: References
- Lumley, J.S.P and Bailey H. (2001) Hamilton Baileys physical signs: Demonstration of physical signs: in Clinical Surgery.
- Macleod J. Douglas G. Nicol, E. F. and Robertson C. (2009). Macleod’s Clinical Examination Edinburg; Churchill Livingstone/ Elsevier
- Tally N. J. and O’ Conner, S. (2001). Clinical examination: A Systemic Guide to physical diagnosis. Diagnosis, Oxford: Blackwell science.
- Thomas J. and Mohaghan T. (2014) Oxford Hand book of clinical examination and practical skills. Oxford University press.
Click here to access Unit Two Content..
Topic 1: RESPIRATORY SYSTEM EXAMINATION
Introduction
- Start by washing your hands.
- Introduce yourself to the patient and obtain informed consent.
- Check the patient is not in any pain or discomfort and ensure he/she is positioned correctly, ideally with the chest fully exposed (this may cause embarrassment in female patients so one can try and access the auscultation points without full exposure but this may compromise the accuracy of the examination).
- The patient should be lying in bed with their upper body at 45 degrees and a pillow supporting the head.
General Inspection
- Begin the examination at the end of the bed with an inspection of the patient’s general condition and their surroundings.
- Explain to the patient what you are doing to avoid embarrassment. Although each anatomical area will be examined in detail later in the examination it is important to note signs such as dyspnoea, pallor or cyanosis which may be detectable at this stage.
- Note any medical equipment attached to the patient or in the bedspace
The Hands
Move to the right-hand side of the patient and examine the hands. Ask the patient to hold-out their hands and hold them gently with yours.
- Begin by looking at the fingers, especially the finger tips, and the nails.
- Examine for finger clubbing.
- Other signs in the hand may include: nail changes, tar staining indicative of recent smoking, wasting of the small muscles of the hand, especially at the thenar and hypothenar eminences, seen when apical lung tumours (Pancoast’s tumour) impinge on the C8/T1 nerve roots, and changes seen in rheumatoid arthritis which may be associated with bronchiectasis and pulmonary fibrosis.
- Peripheral cyanosis may also be detected in the hands giving a blue colour to the tissues caused by the presence of deoxygenated haemoglobin.
- Note that, in the absence of central cyanosis, this is reflective of peripheral vasoconstriction and stasis of blood in the peripheries. Central cyanosis is seen in the tongue and lips due to desaturation of central arterial blood.
- Ask the patient to hold their arms out in front of them, elbows extended, for about ten seconds and assess if they have a tremor.
- Then, maintaining this position, ask them to fully dorsiflex their wrists and hold that position for about thirty seconds whilst you closely observe for asterixis. It is best to give these instructions whilst demonstrating the position at the same time.
- Asterixis is manifest by sudden loss of dorsiflexion causing flexion movements towards the neutral position at the wrist and may be a sign of carbon dioxide retention (‘carbon dioxide flap’) or hepatic encephalopathy (‘liver flap’).
Video on how to examine for asterixis
The Radial Pulse
- Palpate the right radial pulse by placing the tips of your index, middle and ring fingers over the radial artery, usually situated just medial to the radius.
- You should assess the rate, the rhythm and the character of the pulse.
- Establish the rate in beats per minute by counting the number of beats over a 15 second period and multiplying by four.
- The normal resting heart rate should be between 60 and 100 beats per minute.
- Then analyse the rhythm of the pulse and decide if it is regular, irregularly irregular, or regularly irregular.
- A regular pulse is at a constant frequency with a constant interval between the beats.
- If it is not of a constant frequency it is irregular.
- Irregular pulses are conventionally divided into ‘regularly irregular’ and ‘irregularly irregular’.
- A regular pulse is at a constant frequency with a constant interval between the beats.
- A regularly irregular pulse has a repeating pattern – for example two beats close together, then a gap and then another two beats close together.
- If there is no repeating pattern and the beats seem to arise randomly then the pulse is said to be irregularly irregular.
- A correlation of pulse character and underlying cardiac rhythm is beyond the scope of this article but one of the most common abnormalities of pulse rhythm is atrial fibrillation (AF) which gives an irregularly irregular pulse.
- The character of the radial pulse should also be assessed, although it is more accurate to do this in large volume central pulses such as the carotids.
- A ‘slow-rising’ pulse has a delayed up-stroke and occurs in aortic stenosis.
- A pulse is described as ‘bounding’ if it has an increased up-stroke and down-stroke. This may be a sign of CO2 retention.
- A ‘jerky’ pulse is characteristic of hypertrophic cardiomyopathy, but this is unlikely to be detected peripherally.
- Proceed to palpate both radial pulses simultaneously to detect any inequality in timing.
- This is known as radio-radial delay and is a sign of aortic coarctation.
- Check for inequality in the strength of the radial pulses.
- Strength inequality of arm pulses has been shown to be a highly sensitive sign in diagnosing aortic dissection.
- Examine for a collapsing pulse by placing your fingers across the anterior aspect of patient’s forearm and applying just enough pressure to occlude the radial pulse.
- Confirm that the patient has no pain in their shoulder, and then elevate their arm above their head whilst maintaining the position of your hand.
- You are feeling for a forceful knocking sensation that is typical of aortic regurgitation, commonly known as the ‘collapsing’ or ‘water-hammer’ pulse.
- Radio-femoral delay is the sign that is present if the femoral pulse comes after the radial pulse. The two pulses should occur at the same time and radiofemoral delay is a sign of coarctation of the aorta.
- The difficulty exposing the femoral artery means that this part of the examination is not included in routine cardiovascular examinations.
- In OSCEs you should simply indicate to the examiner that at this point you would like to palpate for radio-femoral delay. See Examination of the Peripheral Arterial System.
- Pulsus paradoxus
- Pulsus paradoxus is usually defined as an inspiratory decline in systolic BP that exceeds 10mmHg, but a more appropriate threshold may be 12mmHg which has been shown to be the upper 95% confidence interval for an inspiratory drop in normal individuals.
- It occurs in 98% of patients with cardiac tamponade and is a highly sensitive and specific sign in identifying the condition in those with known pericardial effusions.
- One should therefore always check for pulsus paradoxus in patients with suspected pericardial disease and you should indicate this to the examiner.
- To measure pulsus paradoxus, begin by measuring the BP as described but on hearing the first Korotkoff sound, prevent further deflation of the cuff. In patients with paradox, the sounds are intermittent with respiration. Note this pressure then continue to deflate the cuff until sounds are heard throughout the respiratory cycle. The amount of paradox in mmHg is the difference between the pressure at this point and the initial measurement.
- Pulsus paradoxus is usually defined as an inspiratory decline in systolic BP that exceeds 10mmHg, but a more appropriate threshold may be 12mmHg which has been shown to be the upper 95% confidence interval for an inspiratory drop in normal individuals.
Video on how to measure pulsus paradoxus
The Face
- Begin by looking at the eyes.
- Assess pupil size and symmetry.
- Look at the eyelids, the normal upper lid lies 1.5mm below the superior corneal limbus.
- Ptosis refers to drooping of the upper eyelid, this can be partial or complete.
- Enophthalmos is a sign which refers to posterior displacement of the eye, a difference of 2mm between the eyes is usually evident on examination.
- Look at the facial skin for rashes and anhydrosis (loss of sweating). Ask the patient to open their mouth and elevate their tongue to inspect the underside for marked blue discolouration indicating central cyanosis, reflecting inadequate blood oxygenation in the lungs or increased oxygen extraction in the tissues.
- A malar rash is a characteristic macular, non itchy rash in the shape of a butterfly over the bridge of the nose and across the cheeks. It is present in systemic lupus erythematosus which is associated with pulmonary fibrosis, pleural effusion and pulmonary emboli.
- Lupus pernio is a rash characterised by violaceous smooth shiny plaques on the face which is a sign of sarcoidosis which is associated with pulmonary fibrosis and bronchiectasis.
- Ptosis, miosis (small pupil), anhydrosis and apparent endophthalmos are seen in Horners Syndrome.
- Horner’s syndrome is caused by disruption of the sympathetic input to the face and can be caused by Pancoast’s tumour. This is an eponym for apical lung tumours which are prone to invading the cervical or thoracic sympathetic chain interrupting the supply to the neck, head and face.
The neck
The neck is a sensitive area and examination may be uncomfortable so it is important to inform the patient in advance.
- Start by examining the trachea for deviation and for tug.
- Placing your index and ring finger of the right hand on the head of each clavicle, use the middle finger of the same hand to palpate the trachea in the sternal notch.
- Roll you finger across the trachea in the axial (horizontal) plane to assess for deviation.
- The trachea is a midline structure and should lie equidistant between the clavicular heads.
- Next place your index finger of the right hand on the trachea against the inferior edge of the cricoid cartilage.
- Place subsequent fingers, in the sagittal (vertical) plane, below this into the sternal notch until the trachea is no longer palpable and the sternum is reached, this is referred to as the crico-sternal distance and is normally three finger widths (5cm) or above.
- Note whether the trachea moves inferiorly, reducing the crico-sternal distance on inspiration, referred to as tracheal tug.
- A reduction in the crico-sternal distance and tracheal tug signify marked chest hyperexpansion, usually secondary to airflow obstruction and are commonly seen in COPD
- Examine for cervical lymphadenopathy from behind the patient if possible.
- Standing directly behind the patient place both hands under their chin to assess for cervical lymphadenopathy.
- Use the sensitive pulps of your fingers to simultaneously palpate the left and right; submental, submandibular, anterior and posterior cervical chains, supraclavicular, pre-auricular, post-auricular and occipital lymph nodes, in turn.
- Comparing with the contralateral side note the location, size and characteristics of any masses using the techniques described in The Journal of Clinical Examination: Examination of lumps and bumps.
- Next examine the JVP
- With the patient is lying at a 45 degree angle, ask them to turn their head slightly away from you whilst relaxing their head against a pillow.
- Observe along the surface of the neck rather than observing in a perpendicular orientation, as the movement is easier to discern in this plane, for the double pulsation of the jugular venous pressure (JVP) which originates between the two heads of the sternocleidomastoid muscle.
- If you are unsure, you can attempt to palpate the pulse, unlike the carotid pulse, it will be impalpable. Under normal conditions, the JVP should be less than 4cm above the sternal angle in the vertical plane.
- The JVP is an indirect measure of central venous pressure and can be raised secondary to right heart failure (cor pulmonale), which can exist secondary to a variety of chronic lung diseases, including COPD, fluid overload, increased intrathoracic pressure, cardiac tamponade or constrictive pericarditis.
- It may also occur in superior vena cava obstruction.
- Such obstruction can be caused by a bronchial carcinoma, especially of the right upper lobe.
- This leads to venous distension and oedema in the neck, face, upper chest and arms.
Click here to access Unit Two Content..
Topic 1: RESPIRATORY SYSTEM EXAMINATION (Cont')
The Chest – Anterior
Palpate
- Examine expansion of the chest.
- Place your hands, palm down either side of the manubrium, with your thumbs equidistant from the midline and raised slightly with your fingers on the chest, wrapped around the thorax.
- Ask the patient to take deep breaths in and observe your hands simultaneously rising with each inspiration.
- Place your hands on the lower anterior thorax and using the same technique.
- Ask the patient to breathe out and then take a deep breath in.
- As the patient inspires, you should be able to measure the expansion of both sides of the chest by observing your thumb’s movements relative to the midline. This should normally be at least 5cm.
- Place you right hand against the thorax over the fifth intercostal space, mid-clavicular line to palpate for the cardiac apex beat.
- In female patients, it may be appropriate to lift the left breast using the back of your left hand to lift the breast from underneath whilst palpating with your right.
- Place the base of your right hand firmly against the chest to the left of the sternum at the level of the heart to palpate for the heart. If the heart beat is palpable this is referred to as a parasternal heave.
- Video on how to measure chest expansion
- Whilst palpating the chest, be vigilant for a crackling sensation under your fingers, which may indicate subcutaneous emphysema.
- Reduced expansion may be secondary to fibrosis, consolidation, effusion, collapse or pneumothorax.
- The cardiac apex beat may not be palpable in obesity and severe lung hyperexpansion. It may be displaced from the fifth intercostal space, mid-clavicular line in pleural effusion, lobar collapse, pneumothorax or pneumonectomy.

- Palpating for a parasternal heave
- A parasternal heave is suggestive of right ventricular hypertrophy which may exist secondary to pulmonary hypertension in chronic obstructive pulmonary disease, interstitial lung disease or multiple pulmonary emboli.
- Inspect
- Inspect the chest from the front and the side. You should have already briefly inspected the chest at the beginning of the examination but at this stage take some time to inspect more closely.
- Do not neglect the lateral aspect of the chest and axillae which may only be visible by asking the patient to move their arms. Any sign is potentially relevant and it is not possible to provide a full list here but the most important signs and their significance are described below.
- The most important things are to note the shape of the chest, the respiratory rate the character of the movement.
- An increased anteroposterior diameter describes a ‘barrel shaped’ chest, seen in patients with severe airflow obstruction (such as chronic obstructive pulmonary disease or severe asthma).
- This is often coupled with a dorsal kyphosis and prominence of the sternum.
- In contrast, a pectus carinatum (‘pigeon-shaped’ chest) results from localised deformity of the sternum and costal cartilage, which bulge outwards. This can exist secondary to chronic respiratory disease in childhood.
- Pectus excavatum (‘funnel-shaped’ chest) is a developmental defect which can arise due to connective tissue disease. It results in a localised depression of the inferior part of the sternum.
- Spinal deformity, kyphosis or lordosis, may impinge on respiration and may be associate with systemic disease such as ankylosing spondylitis, which can lead to apical lung fibrosis.
- Thoracotomy scars and those from breast surgery (which could suggest malignant pleural effusion) may be obvious but it is important to pay close attention to the skin as more subtle scars for example from previous chest drain insertion could give significant clues to underlying pathology yet may not be seen even on close inspection.
- Radiotherapy tattoos, suggesting the presence of malignancy, may be associated with well demarcated inflammation of the skin in the acute stage, or pulmonary fibrosis, potentially detectable on auscultation in the longer term.
Percuss
- Percuss the thorax by placing the middle finger of the left hand firmly against the chest wall. Use the tip of the distal phalynx of the right middle finger to strike the middle phalanx of the left middle finger.
- The striking motion should be firm and brisk. If you are left-handed you may prefer to reverse the roles of the left and right hands but the ergonomics of examining from the right mean that the method described above is ideal if possible.
- The striking action should generate a ‘percussion note’ which on a normal chest is said to be resonant.
- Abnormal percussion notes are classified as either dull or hyper-resonant.
- Begin by percussing over the apex of the lung. This can be achieved either by percussing in the supraclavicular fossa or by percussing the clavicle.
- It is not necessary to percuss both. If percussing in the supraclavicular fossa it may be easier to apply the thumb to the chest wall rather than the finger.
- The clavicle should be percussed directly with the middle finger of the right hand – there is no need to apply a finger to the chest wall at this site.
- Suggested sites for percussion and auscultation of the chest posteriorly (1-5) and and laterally (6 and 7). Anteriorly, three places in the mid axillary line on either side (as well as each apex – percuss the clavicle) is sufficient.
- Next percuss the anterior aspect chest wall followed by the lateral aspect of the chest wall.
- The percussion sites will depend on the clinical context but in a routine examination there is no agreement on the number and distribution of percussion sites that should be chosen.
- The conventional method is to choose three points on the anterior chest wall close to the midclavicular line and two points on the lateral chest wall close to the midaxillary line– this allows a thorough assessment of each of the lobes of each lung.
- The exact site of percussion is not crucial but it is important to percuss the same site in each hemithorax one after the other to allow comparison.
Auscultate
- Using the bell of the stethoscope auscultate the supraclavicular fossae in turn with the patient taking normal breaths through an open mouth.
- Next using the diaphragm auscultate the anterior and lateral chest in the same distribution as described for percussion comparing each hemithorax in turn.
- In thin patients with prominent ribs the bell may need to be used to ensure good skin contact. Pay particular attention when auscultating the right axilla, right middle lobe pathology may only be demonstrated here.
- Repeat auscultation over the same areas, comparing each hemithorax in turn, whilst asking the patient to say ‘ninety-nine’ each time the stethoscope touches their chest to assess for vocal resonance.
- If consolidation is suspected, see below, auscultation can be further repeated with the patient whispering ninety-nine’ to assess for ‘whispering pectoriloquy’.
- Alternately instruct the patient to say the letter ‘E’ or the word ‘bee’ each time you auscultate as above to test for aegophony. If it is present you will hear ‘A’ (as in ate) rather than ‘E’, again suggesting consolidation. Be sure to remove your stethoscope for a second to verify the patient is still saying ‘E’!
- Whilst auscultating, listen for the quality of the breath sounds, the loudness of these sounds and note any added sounds.
- Vocal resonance tests the lung’s ability to transmit sound. In an area of consolidation, the patient’s voice becomes clearer, whilst if there is a pleural effusion, the sound will be damped and the patient’s voice becomes further muffled.
- If vocal resonance is increased to the point where a whisper can be heard clearly this is termed ‘whispering pectoriloquy.’
- Aegophony is another test for areas of consolidation. This phenomenon was originally described by Laennec, the term aegophony is thought to mean ‘goat sound,’ named as such because the sound heard was said by Laennec to be ‘quavering and jerky, like the bleating of a goat.’ Alongside whispering pectoriloquy, aegophony is a sensitive physical finding for consolidation.
Chest – Posterior
- Ask the patient to lean forwards.
- The arms should be crossed to abduct the lower pole of the scapulae.
- Inspect, palpate, percuss and auscultate the posterior chest as described above, repeat in four to five parallel locations; ensuring that you are auscultating down to the level of the 10th rib.
- Expose the lower limbs to the mid thigh. Inspect specifically looking for oedema and rashes.
- Palpate the legs to assess for calf tenderness and for the presence of pitting oedema by applying pressure over a bony prominence for ten seconds to see if pitting is observed.
- The level to which pitting oedema extends should be noted, and sacrum should also be examined for this phenomenon.
- Peripheral oedema may represent congestive cardiac failure or cor pulmonale secondary to pulmonary disease.
- A deep venous thrombosis may present with lower limb swelling or erythema.
- Erythema nodosum, a panniculitis which causes tender nodules; often on the shins may be observed.
- Erythema nodosum may be seen in respiratory disease such as streptococcal infection, tuberculosis and sarcoidosis
Completing the examination
- Thank the patient, help them back into comfortable posture and wash your hands.
- Give the patient some privacy to redress.
- In an OSCE you should finish by addressing the examiner, stethoscope behind your back, not looking back at the patient.
- To complete the examination you should perform pulse oximetry (where feasible) to measure oxygen saturations and measure the temperature. If obstructive airways disease is suspected then you should measure peak expiratory flow using a peak flow meter.
Click here to access Unit Two Content..
Topic 1: Summary
- The examination of the respiratory system begins at the anterior nares (nose).
- The IPPA format is applied in respiratory system examination.
- The triangle of auscultation is the best site for auscultation of the chest.
- Both anterior and posterior chest are examined and documented separately.
Click here to access Unit Two Content..
Topic 1: References
- Macleod J. Douglas G. Nicol, E. F. and Robertson C. (2009). Macleod’s Clinical Examination Edinburg; Churchill Livingstone/ Elsevier
- Tally N. J. and O’ Conner, S. (2001). Clinical examination: A Systemic Guide to physical diagnosis. Diagnosis, Oxford: Blackwell science.
Click here to access Unit Two Content..
Topic 2: CARDIOVASCULAR SYSTEM EXAMINATION
Introduction
Preparation
- Start by washing your hands
- Introduce yourself to the patient and obtain informed consent.
- Check the patient is not in any pain or discomfort and ensure he/she is positioned correctly, ideally with the chest fully exposed (this may cause embarrassment in female patients so one can try and access the auscultation points without full exposure but this may compromise the accuracy of the examination).
- The patient should be lying in bed with their upper body at 45 degrees and a pillow supporting the head.
General Inspection
- Begin the examination at the end of the bed with an inspection of the patient’s general condition and their surroundings.
- Explain to the patient what you are doing to avoid embarrassment. Although each anatomical area will be examined in detail later in the examination it is important to note signs such as dyspnoea, pallor or cyanosis which may be detectable at this stage.
- Note any medical equipment attached to the patient or in the bedspace
The inverted J-Approach;
The Hands
Move to the left-hand side of the bed (the patient’s right side) and examine their hands.
- Begin by inspecting the finger nails for splinter haemorrhages and clubbing.
- Splinter haemorrhages are reddish-brown linear haemorrhages lying parallel to the long axis of the nail. They are a sign of previous trauma (classically gardening or mechanical work) or pathologically of infective endocarditis
- Clubbing is an enlargement of the soft tissue of the distal phalanges resulting in an exaggerated nail curvature, nail-fold bogginess and an angle of greater than 180° between the nail and nail-fold.
- Examine each of the fingers of each hand for these signs.
- Clubbing is an important sign but evidence suggests that it has poor precision. Schamroth’s sign may be a more reliable way to diagnose clubbing.
- Try to elicit Schamroth’s sign by asking the patient to curl the fingers of both hands towards the palms and then bring their hands together so the nails and distal interphalangeal joints of the two middle fingers touch.
- If clubbing is absent there should be a diamond shaped gap between the two nails. The loss of this gap is Schamroth’s sign and is an indicator of clubbing.
- Clubbing also occurs in the toe-nails but the toes are not routinely examined as part of the examination of the cardiovascular system.
 Examining for Schamroth’s sign when looking for clubbing
- Examine the dorsum of the hands.
- Inspect along the extensor tendons for cholesterol deposits called xanthomata. These are irregularly-shaped, yellowish nodules on the skin.
- Then ask the patient to turn their hands over and examine the finger pulps for painful, red, raised nodules known as Osler nodes and the palms for flat, red macules known as Janeway lesions. These are both highly specific signs of infective endocarditis but they tend to present in the later stages of the disease and so are not commonly seen in the developed world.
- Note the temperature of the hands and the colour of the skin.
- Assess the patient’s peripheral perfusion by squeezing the fingertip firmly for five seconds then letting go and recording the time taken for normal colour to return. This is the capillary refill time and should be less than three seconds. A delay indicates poor perfusion of the extremities which may be caused by hypovolaemia, hypothermia, peripheral vascular disease or just cool peripheries (with associated vasoconstriction)
The Radial Pulse
- Palpate the right radial pulse by placing the tips of your index, middle and ring fingers over the radial artery, usually situated just medial to the radius.
- You should assess the rate, the rhythm and the character of the pulse.
- Establish the rate in beats per minute by counting the number of beats over a 15 second period and multiplying by four.
- The normal resting heart rate should be between 60 and 100 beats per minute.
- Then analyse the rhythm of the pulse and decide if it is regular, irregularly irregular, or regularly irregular.
- A regular pulse is at a constant frequency with a constant interval between the beats.
- If it is not of a constant frequency it is irregular.
- Irregular pulses are conventionally divided into ‘regularly irregular’ and ‘irregularly irregular’.
- A regular pulse is at a constant frequency with a constant interval between the beats.
- A regularly irregular pulse has a repeating pattern – for example two beats close together, then a gap and then another two beats close together.
- If there is no repeating pattern and the beats seem to arise randomly then the pulse is said to be irregularly irregular.
- A correlation of pulse character and underlying cardiac rhythm is beyond the scope of this article but one of the most common abnormalities of pulse rhythm is atrial fibrillation (AF) which gives an irregularly irregular pulse.
- The character of the radial pulse should also be assessed, although it is more accurate to do this in large volume central pulses such as the carotids.
- A ‘slow-rising’ pulse has a delayed up-stroke and occurs in aortic stenosis.
- A pulse is described as ‘bounding’ if it has an increased up-stroke and down-stroke. This may be a sign of CO2 retention.
- A ‘jerky’ pulse is characteristic of hypertrophic cardiomyopathy, but this is unlikely to be detected peripherally.
- Proceed to palpate both radial pulses simultaneously to detect any inequality in timing.
- This is known as radio-radial delay and is a sign of aortic coarctation.
- Check for inequality in the strength of the radial pulses.
- Strength inequality of arm pulses has been shown to be a highly sensitive sign in diagnosing aortic dissection.
- Examine for a collapsing pulse by placing your fingers across the anterior aspect of patient’s forearm and applying just enough pressure to occlude the radial pulse.
- Confirm that the patient has no pain in their shoulder, and then elevate their arm above their head whilst maintaining the position of your hand.
- You are feeling for a forceful knocking sensation that is typical of aortic regurgitation, commonly known as the ‘collapsing’ or ‘water-hammer’ pulse.
- Radio-femoral delay is the sign that is present if the femoral pulse comes after the radial pulse. The two pulses should occur at the same time and radiofemoral delay is a sign of coarctation of the aorta.
- The difficulty exposing the femoral artery means that this part of the examination is not included in routine cardiovascular examinations.
- In OSCEs you should simply indicate to the examiner that at this point you would like to palpate for radio-femoral delay. See Examination of the Peripheral Arterial System.

Examining for a collapsing pulse
Blood Pressure
- Measure the patient’s arterial blood pressure using a spyhgnomanometer. In an OSCE, it is unlikely you will have the time to actually measure it but it is an essential part of the cardiovascular examination and you must indicate this to the examiner at this point.
- Ensure the cuff is the appropriate size for the patient. An undersized cuff will overestimate the ABP and vice versa.
- Ensure the patient is comfortable and support their arm at around heart level.
- Wrap the cuff around the upper arm, palpate the radial artery and then inflate the cuff until the radial pulse can no longer be detected. The pressure at which the pulse is lost gives a rough estimate of the systolic blood pressure.
- Deflate the cuff and place your stethoscope over the brachial artery which is situated in the antecubital fossa, just medial to the biceps tendon, midway between the medial and lateral epicondyles of the humerus.
- Reinflate the cuff to around 20mmHg above the estimated systolic blood pressure and then deflate it slowly (2-3mmHg per second) until a sound is first heard over the artery (Korotkoff 1). The pressure at which this occurs is the systolic blood pressure.
- Continue to deflate the cuff until the sounds disappear (Korotkoff V). The pressure at which this occurs is the diastolic blood pressure.
- Normal arterial blood pressure is defined as systolic blood pressure of less than 140mmHg and diastolic blood pressure of less than 90mmHg. Having measured the arterial blood pressure go on to
calculate the pulse pressure which is the difference between the systolic blood pressure and the diastolic blood pressure. The pulse pressure may be narrow in aortic stenosis and wide in aortic regurgitation.
- Postural blood pressure;
- A full examination of the cardiovascular system should include lying and standing blood pressure to see if there is a postural drop in blood pressure. But this should not be done at this stage in a medical school examination because there is not sufficient time. Simply indicate to the examiner that you would like to perform it and mention it again at the end of your examination.
- To measure the postural blood pressure, position the patient lying supine, wait two minutes then measure the blood pressure as described above.
- Then stand the patient up, wait a further minute and repeat the blood pressure reading.
- A postural drop in blood pressure is defined as a fall on standing of greater than 15mmHg in systolic BP or 10mmHg diastolic.
Face, Eyes and Mouth
- Look around the eyes for yellow cholesterol deposits known as xanthelasma.
- These are sharply demarcated, yellow plaques, usually around 1-2mm and most commonly found on the upper and lower eyelids.
- Examine the iris for senile arcus, a grey or white arc visible around the cornea.
- These are signs of hyperlipidaemia.
- Ask the patient to look up, and retract the lower eyelid to inspect for conjunctival pallor which is a sign of anaemia.
- Use a pen-torch to examine the inside of the mouth. Inspect below the tongue and the lips for central cyanosis, a blue discolouration of the skin and mucous membranes as a result of hypoxia.
- Inspect the mucosa for petechiae which can be caused by infective endocarditis and note the patient’s dental hygiene. Poor dental hygiene is a risk factor for infective endocarditis.
The Neck
- Examination of the neck includes assessment of the jugular pulse and the carotid pulse.
The Jugular Venous Pulse
- The jugular venous pulse (JVP) provides an estimate of the central venous pressure (CVP) and hence the patient’s volume status and heart function. Although it is an important part of the examination, clinical assessment of CVP using the JVP has poor sensitivity.
- To assess the JVP, ask the patient to turn their head to the left and extend their neck directly backwards. It may be helpful to gently move the patient’s head into the correct position.
Video on how to examine the JVP
- First measure the height of the JVPs highest point in centimetres. This is the vertical height above the sternal angle at which a pulsation is observed in the internal jugular vein.
- It is very important that the patient is positioned at 45° because this angle directly influences the height of the JVP for any given CVP.
- Look for the JVP along the course of the vein which travels from the earlobe, down the neck and into the chest, between the two heads of sternocleidomastoid. A JVP of greater than 4cm is said to be elevated.
- It may be difficult to distinguish the JVP from the carotid pulse but there are a number of differentiating features that will help you make the distinction.
- Make an assessment of the waveform of the JVP. Figure 1 of Levick & Dwight shows the normal waveform.
- Simultaneously palpating the contralateral carotid may help you in identifying its different components.
- The a-wave coincides with the first heart sound and precedes the carotid pulse.
- Go on to try and elicit hepatoojugular reflux. Ensure the patient has no abdominal pain and press firmly on their right upper quadrant for 15-30 seconds and inspect the JVP.
- A sustained increase of 4cm or greater throughout the compression is a sign of right ventricular failure.
- Ask the patient to breathe slowly through the mouth, then look for the presence of Kussmaul’s sign: a paradoxical increase in the JVP with inspiration.
- This can occur in any condition where right ventricular filling is restricted such as constrictive pericarditis or cardiac tamponade.
Click here to access Unit Two Content..
Topic 2: CARDIOVASCULAR SYSTEM EXAMINATION (Cont')
The Carotid Pulse
- Palpate the carotid artery, medial to the sternocleidomastoid, paying particular attention to its character and volume, as well as the rate and rhythm. Palpate each side in turn, never simultaneously as this may compromise the cerebral blood supply.
Video on how to assess the carotid pulse
The Precordium
Inspect
- Begin by inspecting for scars.
- Look at the midline of the chest for a median sternotomy scar which would indicate previous valve surgery or a coronary artery by-pass graft.
- Examine the mid-axillary lines for a lateral thoracotomy scar indicating previous thoracic surgery.
- Look under the clavicles for a cardiac pacemaker or defibrillator.
- Look for visible cardiac impulses.
Palpate
- Palpate the apex beat first.
- The apex beat is defined as the most lateral and inferior point on the chest wall at which a cardiac impulse can be felt.
- To locate it, identify the sternal angle found at the junction of the sternum and second rib, move your fingers laterally and inferiorly to the second intercostal space, then count down the intercostal spaces in the midclavicular line.
- The apex beat should be situated in the fifth intercostal space along the midclavicular line.
- If the apex beat is impalpable here, move inferiorly and laterally.
- Displacement of the apex in this direction suggests cardiomegaly.
- Go on to assess the character of the apex beat.
- Decide if it is normal, pressure-overloaded or volume-overloaded.
- A pressure-overloaded apex is heaving, sustained and forceful, and develops as a result of aortic stenosis or hypertension.
- A volume-overloaded apex is diffuse and displaced laterally and/or inferiorly.
- This may be a feature of aortic or mitral regurgitation, dilated cardiomyopathy or ventricular damage due to ischaemic heart disease.
- A ‘tapping’ apex beat is a palpable first heart sound and a sign of mitral stenosis.
- A ‘double impulse’ apex (two beats per cardiac cycle) is a sign of hypertrophic cardiomyopathy.
- Place the heel of your hand over the lower left sternal edge and feel for a right ventricular heave as a push against your hand. This is a sign of right ventricular hypertrophy.
- Then feel for thrills by systematically placing the flat of your hand over the apex (mitral valve area), lower left sternal edge (tricuspid valve area), right 2nd intercostal space (aortic valve area) and left 2nd intercostal space (pulmonary valve area).
- Decide if it is normal, pressure-overloaded or volume-overloaded.
Video on how to examine the apex beat, heaves and thrills
Auscultate
- Positions
- Begin auscultation of the heart by listening over the four valve areas shown in the figure below with the diaphragm of the stethoscope.
- Auscultate in the following order:
- mitral
- tricuspid
- aortic
- pulmonary
- Then auscultate over both carotid arteries and the left axilla to detect the radiating murmurs of aortic stenosis and mitral regurgitation respectively.
- Listen over each carotid using the bell whilst the patient comfortably holds a breath.
- Auscultation over the carotids also allows for the detection of a stenotic carotid bruit which can be distinguished from a radiating murmur by identifying the site of the sound’s maximal intensity; the former heard loudest above the thyroid cartilage, the latter over the precordium.

The four auscultatory areas
- Heart Sounds
- During auscultation you should listen for the following at each valve position: first and second heart sounds (S1 and S2), added heart sounds and murmurs.
- S1 and S2
- When auscultating the valve areas, start by identifying the first (S1) and second (S2) heart sounds which are caused by the closure of the atrioventricular and semi-lunar valves respectively.
- Simultaneously palpating a peripheral pulse (the radial is often the most convenient) will help to distinguish systole and diastole.
- S1 marks the start of systole and coincides with the peripheral pulsation. Physiological splitting of S2 is common, and characteristically increases at end-inspiration but wide splitting (exaggerated physiological splitting), fixed splitting (unaffected by respiration) and reverse splitting (widens in expiration) all have underlying pathologies.
- Added Sounds
- Now listen between S1 and S2 for added heart sounds.
- The 3rd heart sound (S3) is a low-pitched extra heart sound that occurs in early diastole, just after S2, and is best heard over the apex. It produces a ‘gallop’ rhythm often compared to the cadence of the word ‘Kentucky’ with the syllables ‘ken’, ‘tuc’ and ‘ky’ representing S1, S2 and S3 respectively.
- The presence of the third heart sound may indicate left ventricular failure, mitral regurgitation or high output cardiac states, but it can be physiological in the young.
- Listen for a fourth heart sound (S4), which is slightly higher-pitched and occurs in late-diastole, immediately before S1. It produces a ‘gallop’ rhythm often compared to the cadence of the word ‘Tennessee’ with the syllables ‘ten’, ‘nes’ and ‘see’ representing S4, S1 and S2 respectively.
- A fourth heart sound is indicative of a poorly compliant ventricle and is always pathological, associated with aortic stenosis, hypertension and left ventricular failure.
- Go on to auscultate for other abnormal sounds. First, listen for an ejection click, a high-pitched ringing sound heard in early systole shortly after S1. This is a feature of aortic or pulmonary stenosis and is thought to be caused by the sudden opening of the deformed valve. Listen for a mid-systolic click, a sound most often associated with mitral valve prolapse which may be accompanied by a late systolic murmur. Listen in early diastole for an opening snap heard in mitral stenosis. This is best heard over the lower left sternal edge and is caused by the rapid opening of a stenosed but pliable mitral valve under high left atrial pressure.
- Finally, listenthroughout the cardiac cycle for the ‘walking on snow’ sound of a pericardial friction rub, caused by pericarditis.
- The 3rd heart sound (S3) is a low-pitched extra heart sound that occurs in early diastole, just after S2, and is best heard over the apex. It produces a ‘gallop’ rhythm often compared to the cadence of the word ‘Kentucky’ with the syllables ‘ken’, ‘tuc’ and ‘ky’ representing S1, S2 and S3 respectively.
- Now listen between S1 and S2 for added heart sounds.
- Murmurs
- Murmurs should be considered in terms of timing, site of greatest intensity, character, loudness, and
radiation. - The intensity of a murmur does not really help in assessing the severity of the valve lesion, but a change in intensity may be of importance. Murmur intensity can be quantified using Levine’s grading system. Of all the features of a murmur, its timing is most important diagnostically.
- Murmurs should be considered in terms of timing, site of greatest intensity, character, loudness, and
Auscultate with Manoeuvres
- Murmurs are accentuated by the position of the patient during auscultation and the following manoeuvres should be performed as part of the routine examination.
- Ask the patient to turn onto their left hand side. Ensure they are comfortable then ask them to hold their breath in expiration.
- Auscultate the apex with the bell. You are listening for the accentuated mid-diastolic murmur of mitral stenosis.
- Then ask the patient to sit forward. Ensure they are still comfortable and again ask them to hold their breath in expiration.
- Auscultate over the lower left sternal edge with the diaphragm. You are listening for the accentuated early diastolic murmur of aortic regurgitation.
- Whilst expiration accentuates left-sided murmurs, inspiration accentuates right-sided murmurs. This can be remembered because RIGHT has an ‘I‘ (inspiration) in it and LEFT has an ‘e‘ (expiration) in it.
- and this may help in distinguishing the pan-systolic murmurs of mitral and tricuspid regurgitation. A pansystolic murmur that increases in intensity in expiration is most likely due to mitral regurgitation whereas one that increases in inspiration is mostlikely due to tricuspid regurgitation.
The Back, Abdomen and Legs
- Ask the patient to lean forwards.
- Percuss the lung bases for a pleural effusion and auscultate for fine inspiratory crackles (signs of heart failure).
- Check for sacral oedema by placing one finger firmly on the sacrum for ten seconds and observing for the persistence of an indentation after release.
- Examine the ankles for pedal oedema by placing one finger firmly on the ankle for five seconds and observing for the persistence of an indentation after release.
- If present, repeat the procedure at regular points on the legs moving upwards towards the knees. Note the point on the leg to which the oedema extends.
Completing the Examination
- Thank the patient, help them back into comfortable posture and wash your hands.
- Give the patient some privacy to redress.
- In an OSCE you should finish by addressing the examiner, stethoscope behind your back, not looking back at the patient.
- To present, reiterate the manouevres you mentioned during the examination but did not perform. These will include examination of the toenails, examining for radio-femoral delay, and measuring postural blood pressure. You should also indicate your desire to examine the peripheral pulses as detailed in the Examination of the Peripheral Arterial System and to examine the abdomen for an abdominal aortic aneurysm and an enlarged liver (heart failure). Go on to explain the special tests and bedside investigations you would like to undertake, as detailed below.
Pulsus paradoxus
- Pulsus paradoxus is usually defined as an inspiratory decline in systolic BP that exceeds 10mmHg, but a more appropriate threshold may be 12mmHg which has been shown to be the upper 95% confidence interval for an inspiratory drop in normal individuals.
- It occurs in 98% of patients with cardiac tamponade and is a highly sensitive and specific sign in identifying the condition in those with known pericardial effusions.
- One should therefore always check for pulsus paradoxus in patients with suspected pericardial disease and you should indicate this to the examiner.
- To measure pulsus paradoxus, begin by measuring the BP as described but on hearing the first Korotkoff sound, prevent further deflation of the cuff. In patients with paradox, the sounds are intermittent with respiration. Note this pressure then continue to deflate the cuff until sounds are heard throughout the respiratory cycle. The amount of paradox in mmHg is the difference between the pressure at this point and the initial measurement.
Bedside Investigations
- Routine observations are an essential part of the cardiovascular exam.
- You have already calculated the heart rate and BP. You also need to know the respiratory rate, the oxygen saturations and the temperature of the patient.
- An ECG should be checked for signs of ischaemia or arrhythmia
- Uninalysis is indicated if endocarditis is suspected
- An echocardiogram is indicated if there is suspicion of structural or valve disease
Click here to access Unit Two Content..
Topic 2: Summary
- The inverted J approach is used in the examination of the cardiovascular system.
- The IPPA approach is used in cardiovascular examination
Click here to access Unit Two Content..
Topic 3: ABDOMINAL EXAMINATION

The major components of the abdominal exam include:
- Inspection,
- Palpation
- Percussion
- Auscultation.
- While these are the same elements which make up the pulmonary and cardiac exams, they are performed here in a slightly different order (i.e. auscultation before percussion) and carry different degrees of importance. Pelvic, genital, and rectal exams, all part of the abdominal evaluation, are discussed elsewhere.
- However, the IPPA- Inspection, Palpation, Percussion and Auscultation format remains.
Think Anatomically: When looking, listening, feeling and percussing imagine what organs live in the area that you are examining. The abdomen is roughly divided into four quadrants: right upper, right lower, left upper and left lower. By thinking in anatomic terms, you will remind yourself of what resides in a particular quadrant and therefore what might be identifiable during both normal and pathologic states.
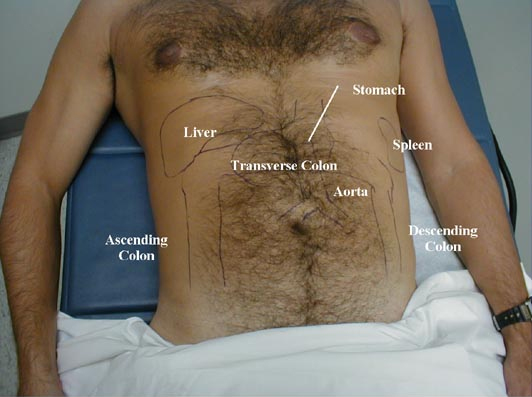
By convention, the abdominal exam is performed with the provider standing on the patient's right side unless one is left handed.
Inspection:
Much information can be gathered from simply watching the patient and looking at the abdomen. This requires complete exposure of the region in question, which is accomplished as follows:
- Ask the patient to lie on a level examination table that is at a comfortable height for both of you. At this point, the patient should be dressed in a gown and, if they wish, underwear.
- Take a spare bed sheet and drape it over their lower body such that it just covers the upper edge of their underwear (or so that it crosses the top of the pubic region if they are completely undressed). This will allow you to fully expose the abdomen while at the same time permitting the patient to remain somewhat covered. The gown can then be withdrawn so that the area extending from just below the breasts to the pelvic brim is entirely uncovered, remembering that the superior margin of the abdomen extends beneath the rib cage.Draping the Abdomen
- The patient's hands should remain at their sides with their heads resting on a pillow. If the head is flexed, the abdominal musculature becomes tensed and the examination made more difficult. Allowing the patient to bend their knees so that the soles of their feet rest on the table will also relax the abdomen.
- Keep the room as warm as possible and make sure that the lighting is adequate. By paying attention to these seemingly small details, you create an environment that gives you the best possible chance of performing an accurate examination. This is particularly important early in your careers, when your skills are relatively unrefined. However, it will also stand you in good stead when examining obese, anxious, distressed or otherwise challenging patients.
While inspecting the patient, pay particular attention to:
- Appearance of the abdomen. Is it flat? Distended? If enlarged, does this appear symmetric or are there distinct protrusions, perhaps linked to underlying organomegaly? The contours of the abdomen can be best appreciated by standing at the foot of the table and looking up towards the patient's head. Global abdominal enlargement is usually caused by air, fluid, or fat. It is frequently impossible to distinguish between these entities on the basis of observation alone (see below for helpful maneuvers). Areas which become more pronounced when the patient valsalvas are often associated with ventral hernias. These are points of weakening in the abdominal wall, frequently due to previous surgery, through which omentum/intestines/peritoneal fluid can pass when intra-abdominal pressure is increased.
Various Causes of Abdominal Distension
 Obese abdomen
 Hepatomegaly
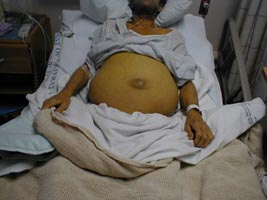 Ascites
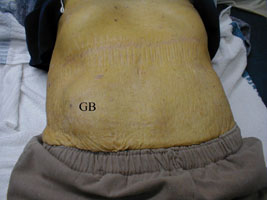 Markedly enlarged gall bladder
(labeled "GB")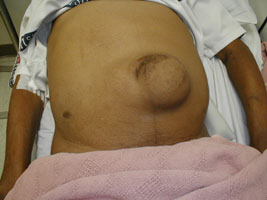 Umbilical Hernia
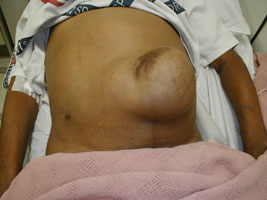 Same umbilical hernia while patient performs valsalva maneuver.
 - Presence of surgical scars or other skin abnormalities.
- Patient's movement (or lack thereof). Those with peritonitis (e.g. appendicitis) prefer to lie very still as any motion causes further peritoneal irritation and pain. Contrary to this, patients with kidney stones will frequently writhe on the examination table, unable to find a comfortable position.
Auscultation:
Compared to the cardiac and pulmonary exams, auscultation of the abdomen has a relatively minor role. It is performed before percussion or palpation as vigorously touching the abdomen may disturb the intestines, perhaps artificially altering their activity and thus bowel sounds.
Exam is made by gently placing the pre-warmed (accomplished by rubbing the stethoscope against the front of your shirt) diaphragm on the abdomen and listening for 15 or 20 seconds. There is no magic time frame.
The stethoscope can be placed over any area of the abdomen as there is no true compartmentalization and sounds produced in one area can probably be heard throughout. How many places should you listen in? Again, there is no magic answer. At this stage, practice listening in each of the four quadrants and see if you can detect any "regional variations."
Abdominal Auscultation
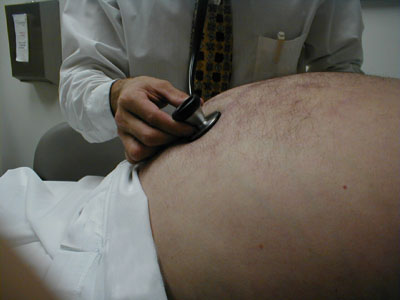
What exactly are you listening for and what is its significance? Three things should be noted:
- Are bowel sounds present?
- If present, are they frequent or sparse (i.e. quantity)?
- What is the nature of the sounds (i.e. quality)?
As food and liquid course through the intestines by means of peristalsis noise, referred to as bowel sounds, is generated. These sounds occur quite frequently, on the order of every 2 to 5 seconds, although there is a lot of variability.
Bowel sounds in and of themselves do not carry great significance. That is, in the normal person who has no complaints and an otherwise normal exam, the presence or absence of bowel sounds is essentially irrelevant (i.e. whatever pattern they have will be normal for them). In fact, most physicians will omit abdominal auscultation unless there is a symptom or finding suggestive of abdominal pathology. However, you should still practice listening to all the patients that you examine so that you develop a sense of what constitutes the range of normal. Bowel sounds can, however, add important supporting information in the right clinical setting. In general, inflammatory processes of the serosa (i.e. any of the surfaces which cover the abdominal organs....as with peritonitis) will cause the abdomen to be quiet (i.e. bowel sounds will be infrequent or altogether absent). Inflammation of the intestinal mucosa (i.e. the insides of the intestine, as might occur with infections that cause diarrhea) will cause hyperactive bowel sounds.
Processes which lead to intestinal obstruction initially cause frequent bowel sounds, referred to as "rushes." Think of this as the intestines trying to force their contents through a tight opening. This is followed by decreased sound, called "tinkles," and then silence. Alternatively, the reappearance of bowel sounds heralds the return of normal gut function following an injury. After abdominal surgery, for example, there is a period of several days when the intestines lie dormant. The appearance of bowel sounds marks the return of intestinal activity, an important phase of the patient's recovery. Bowel sounds, then, must be interpreted within the context of the particular clinical situation. They lend supporting information to other findings but are not in and of themselves pathognomonic for any particular process.
After you have finished noting bowel sounds, use the diaphragm of your stethoscope to check for renal artery bruits, a high pitched sound (analogous to a murmur) caused by turbulent blood flow through a vessel narrowed by atherosclerosis. The place to listen is a few cm above the umbilicus, along the lateral edge of either rectus muscles. Most providers will not routinely check for bruits. However, in the right clinical setting (e.g. a patient with some combination of renal insufficiency, difficult to control hypertension and known vascular disease), the presence of a bruit would lend supporting evidence for the existence of renal artery stenosis. When listening for bruits, you will need to press down quite firmly as the renal arteries are retroperitoneal structures. Atherosclerosis distal to the aorta (i.e. at the take off of the Iliac Arteries) can also generate bruits. Blood flow through the aorta itself does not generate any appreciable sound. Thus, auscultation over this structure is not a good screening test for the presence of aneurysmal dilatation.
Percussion:
The technique for percussion is the same as that used for the lung exam. First, remember to rub your hands together and warm them up before placing them on the patient. Then, place your left hand firmly against the abdominal wall such that only your middle finger is resting on the skin. Strike the distal interphalangeal joint of your left middle finger 2 or 3 times with the tip of your right middle finger, using the previously described floppy wrist action (see under lung exam). There are two basic sounds which can be elicited:
- Tympanitic (drum-like) sounds produced by percussing over air filled structures.
- Dull sounds that occur when a solid structure (e.g. liver) or fluid (e.g. ascites) lies beneath the region being examined.
*Special note should be made if percussion produces pain, which may occur if there is underlying inflammation, as in peritonitis. This would certainly be supported by other historical and exam findings.
Abdominal Percussion
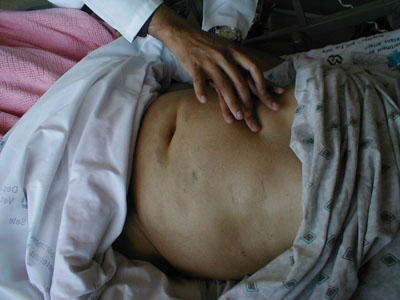
What can you really expect to hear when percussing the normal abdomen? The two solid organs which are percussable in the normal patient are the liver and spleen. In most cases, the liver will be entirely covered by the ribs. Occasionally, an edge may protrude a centimeter or two below the costal margin. The spleen is smaller and is entirely protected by the ribs. To determine the size of the liver, proceed as follows:
- Start just below the right breast in a line with the middle of the clavicle, a point that you are reasonably certain is over the lungs. Percussion in this area should produce a relatively resonant note.
- Move your hand down a few centimeters and repeat. After doing this several times, you will be over the liver, which will produce a duller sounding tone.
- Continue your march downward until the sound changes once again. This may occur while you are still over the ribs or perhaps just as you pass over the costal margin. At this point, you will have reached the inferior margin of the liver. The total span of the normal liver is quite variable, depending on the size of the patient (between 6 and 12 cm). Don't get discouraged if you have a hard time picking up the different sounds as the changes can be quite subtle, particularly if there is a lot of subcutaneous fat.
- The resonant tone produced by percussion over the anterior chest wall will be somewhat less drum like then that generated over the intestines. While they are both caused by tapping over air filled structures, the ribs and pectoralis muscle tend to dampen the sound.
- Speed percussion, as described in the pulmonary section, may also be useful. Orient your left hand so that the fingers are pointing towards the patients head. Percuss as you move the hand at a slow and steady rate from the region of the right chest, down over the liver and towards the pelvis. This maneuver helps to accentuate different percussion notes, perhaps making the identification of the liver's borders a bit more obvious.
Percussion of the spleen is more difficult as this structure is smaller and lies quite laterally, resting in a hollow created by the left ribs. When significantly enlarged, percussion in the left upper quadrant will produce a dull tone. Splenomegaly suggested by percussion should then be verified by palpation (see below). The remainder of the normal abdomen is, for the most part, filled with the small and large intestines. Try percussing each of the four quadrants to get a sense of the normal variations in sound that are produced. These will be variably tympanitic, dull or some combination of the above, depending on whether the underlying intestines are gas or liquid filled. The stomach "bubble" should produce a very tympanitic sound upon percussion over the left lower rib cage, close to the sternum.
Percussion can be quite helpful in determining the cause of abdominal distention, particularly in distinguishing between fluid (a.k.a. ascites) and gas. Of the techniques used to detect ascites, assessment for shifting dullness is perhaps the most reliable and reproducible. This method depends on the fact that air filled intestines will float on top of any fluid that is present. Proceed as follows:
- With the patient supine, begin percussion at the level of the umbilicus and proceed down laterally. In the presence of ascites, you will reach a point where the sound changes from tympanitic to dull. This is the intestine-fluid interface and should be roughly equidistant from the umbillicus on the right and left sides as the fluid layers out in a gravity-dependent fashion, distributing evenly across the posterior aspect of the abdomen. It should also cause a symmetric bulging of the patient's flanks.
- Mark this point on both the right and left sides of the abdomen and then have the patient roll into a lateral decubitus position (i.e. onto either their right or left sides).
- Repeat percussion, beginning at the top of the patient's now up-turned side and moving down towards the umbilicus. If there is ascites, fluid will flow to the most dependent portion of the abdomen. The place at which sound changes from tympanitic to dull will therefore have shifted upwards (towards the umbillicus) and be above the line which you drew previously. Speed percussion (described above) may also be used to identify the location of the air-fluid interface. If the distention is not caused by fluid (e.g. secondary to obesity or gas alone), no shifting will be identifiable.
The models below should help to clarify the concept of shifting dullness. With the "patient" lying flat on their back balloons (representing the intestines)
float on the water (representing ascites). When the "patient" turns on their right side, a new air fluid level is established.Shifting Dullness (real patient)

Realize that there has to be a lot of ascites present for this method to be successful as the abdomen and pelvis can hide several hundred cc's of fluid that would be undetectable on physical exam. Also, shifting dullness is based on the assumption that fluid can flow freely throughout the abdomen. Thus, in cases of prior surgery or infection with resultant adhesion formation, this may not be a very useful technique. Palpation can also be used to check for ascites (see below).
Click here to access Unit Two Content..
Topic 3: ABDOMINAL EXAMINATION (Cont)

Palpation:
First warm your hands by rubbing them together before placing them on the patient. The pads and tips (the most sensitive areas) of the index, middle, and ring fingers are the examining surfaces used to locate the edges of the liver and spleen as well as the deeper structures. You may use either your right hand alone or both hands, with the left resting on top of the right. Apply slow, steady pressure, avoiding any rapid/sharp movements that are likely to startle the patient or cause discomfort. Examine each quadrant separately, imagining what structures lie beneath your hands and what you might expect to feel.
- Start in the right upper quadrant, 10 centimeters below the rib margin in the mid-clavicular line. This should insure that you are below the liver edge. In general, it is easier to detect abnormal if you start in an area that you're sure is normal. Gently push down (posterior) and towards the patient's head with your hand oriented roughly parallel to the rectus muscle, allowing the greatest number of fingers to be involved in the exam as you try to feel the edge of the liver. Advance your hands a few cm cephelad and repeat until ultimately you are at the bottom margin of the ribs. Initial palpation is done lightly.Abdominal Palpation
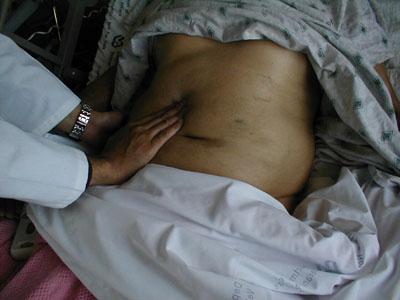
- Following this, repeat the examination of the same region but push a bit more firmly so that you are interrogating the deeper aspects of the right upper quadrant, particularly if the patient has a lot of subcutaneous fat. Pushing up and in while the patient takes a deep breath may make it easier to feel the liver edge as the downward movement of the diaphragm will bring the liver towards your hand. The tip of the xyphoid process, the bony structure at the bottom end of the sternum, may be directed outward or inward and can be mistaken for an abdominal mass. You should be able to distinguish it by noting its location relative to the rib cage (i.e. in the mid-line where the right and left sides meet).Rib Cage

- You can also try to "hook" the edge of the liver with your fingers. To utilize this technique, flex the tips of the fingers of your right hand (claw-like). Then push down in the right upper quadrant and pull upwards (towards the patient's head) as you try to rake-up on the edge of the liver. This is a nice way of confirming the presence of a palpable liver edge felt during conventional examination.Hooking Edge of the Liver
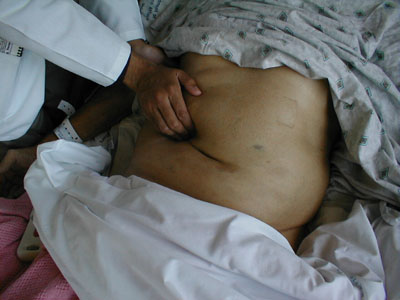
- Place your right hand at the inferior and lateral border of the ribs, pushing down as you push up from behind with your left hand. If the right kidney is massively enlarged, you may be able to feel it between your hands.
- Now examine the left upper quadrant. The normal spleen in not palpable. When enlarged, it tends to grow towards the pelvis and the umbilicus (i.e. both down and across). Begin palpating near the belly button and move slowly towards the ribs. Examine superficially and then more deeply. Then start 8-10 cm below the rib margin and move upwards. In this way, you will be able to feel enlargement in either direction. You can use your left hand to push in from the patient's left flank, directing an enlarged spleen towards your right hand. If the spleen is very big, you may even be able to "bounce" it back and forth between your hands. Splenomegaly is probably more difficult to appreciate then hepatomegaly. The liver is bordered by the diaphragm and can't move away from an examining hand. The spleen, on the other hand, is not so definitively bordered and thus has a tendency to float away from you as you palpate. So, examine in a slow, gentle fashion. The edge, when palpable, is soft, rounded, and rather superficial. Repeat the exam with the patient turned onto their right side, which will drop the spleen down towards your examining hand.
- Exploration for the left kidney is performed in the same fashion as described for the right. Kidney pain, most commonly associated with infection, can be elicited on direct examination if the entire structure becomes palpable as a result of associated edema. This is generally not the case. However, as the kidney lies in the retroperitoneum, pounding gently with the bottom of your fist on the costo-vertebral angle (i.e. where the bottom-most ribs articulate with the vertebral column) will cause pain if the underlying kidney is inflamed. Known as costo-vertebral angle tenderness (CVAT), it should be pursued when the patient's history is suggestive of a kidney infection (e.g. fever, back pain and urinary tract symptoms).
Posterior View: Location of the Kidneys
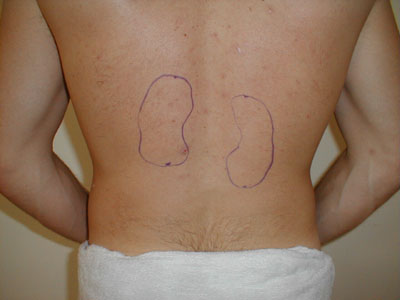 Gross Retroperitoneum Anatomy
- Examine the left and right lower quadrants, palpating first superficially and then deeper. A stool filled sigmoid colon or cecum are the most commonly identified structures on the left and right side respectively. The smooth dome of the bladder may rise above the pelvic brim and become palpable in the mid-line, though it needs to be quite full of urine for this to occur. Other pelvic organs can also occasionally be identified, most commonly the pregnant uterus, which is a firm structure that grows up and towards the umbillicus. The ovaries and fallopian tubes are not identifiable unless pathologically enlarged.
- Finally, try to feel the abdominal aorta. First push down with a single hand in the area just above the umbillicus. If you are able to identify this pulsating structure with one hand, try to estimate its size. To do this, orient your hands so that the thumbs are pointed towards the patient's head. Then push deeply and try to position them so that they are on either side of the blood vessel. Estimate the distance between the palms (it should be no greater then roughly 3 cm). This is, admittedly, a crude technique. Remember also that the aorta is a retorperitoneal structure and can be very hard to appreciate in obese patients. There have been no reports of anyone actually causing the aorta to rupture using this maneuver, so don't be afraid to push vigorously.
What can you expect to feel? In general, don't be discouraged if you are unable to identify anything. Remember that the body is designed to protect critically important organs (e.g. liver and spleen beneath the ribs; kidneys and pancreas deep in the retroperitoneum; etc.). It is, for the most part, during pathologic states that these organs become identifiable to the careful examiner. However, you will not be able to recognize abnormal until you become comfortable identifying variants of normal, a theme common to the examination of any part of the body. It is therefore important to practice all of these maneuvers on every patient that you examine. It's also quite easy to miss abnormalities if you rush or push too vigorously, so take your time and focus on the tips/pads of your fingers.
Examining for a fluid wave: When observation and/or percussion are suggestive of ascites, palpation can be used as a confirmatory test. Ask the patient or an observer to place their hand so that it is oriented longitudinally over the center of the abdomen. They should press firmly so that the subcutaneous tissue and fat do not jiggle. Place your right hand on the left side of the abdomen and your left hand opposite, so that both are equidistant from the umbillicus. Now, firmly tap on the abdomen with your right hand while your left remains against the abdominal wall. If there is a lot of ascites present, you may be able to feel a fluid wave (generated in the ascites by the tapping maneuver) strike against the abdominal wall under your left hand. This test is quite subjective and it can be difficult to say with assurance whether you have truly felt a wave-like impulse.
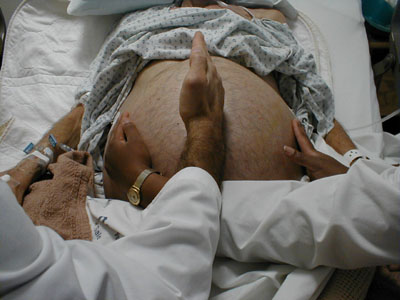
The abdominal examination, like all other aspects of the physical, is not done randomly. Every maneuver has a purpose. Think about what you're expecting to see, hear, or feel. Use information that you've gathered during earlier parts of the exam and apply it in a rational fashion to the rest of your evaluation. If, for example, a certain area of the abdomen was tympanitic during percussion, feel the same region and assure yourself that there is nothing solid in this location. Go back and repeat maneuvers to either confirm or refute your suspicions. In the event that a patient presents complaining of pain in any region of the abdomen, have them first localize the affected area, if possible with a single finger, pointing you towards the cause of the problem. Then, examine each of the other abdominal quadrants first before turning your attention to the area in question. This should help to keep the patient as relaxed as possible and limit voluntary and involuntary guarding (i.e. superficial muscle tightening which protects intra-abdominal organs from being poked), allowing you to gather the greatest amount of clinical data. Make sure you glance at the patient's face while examining a suspected tender area. This can be particularly revealing when evaluating otherwise stoic individuals (i.e. even these patients will grimace if the area is painful to the touch). The goal, of course, is to obtain relevant information while generating a minimal amount of discomfort.
Findings Commonly Associated With Advanced Liver Disease:
Chronic liver disease usually results from years of inflamation, which ultimately leads to fibrosis and decline in function. Histologically, this is referred to as Cirrhosis. This can be driven by a number of different processes, most commonly chronic alcohol use, viral hepatitis (B or C) or hemachromatosis (the complete list is much longer). It's important to realize that a cirrhotic liver can be markedly enlarged (in which case it may be palpable) or shrunken and fibrotic (non-palpable).
After many years (generally greater then 20) of chronic insult, the liver may become unable to perform some or all of its normal functions. There are several clinical manifestations of this dysfunction. While none are pathonomonic for liver disease, in the right historical context they are very suggestive of underlying pathology. Some of the most common findings are described and/or pictured below.
- Hyperbilirubinemia: The diseased liver may be unable to conjugate or secrete bilirubin appropriately. This can lead to
- Icterus - Yellow discoloration of the sclera.
- Jaundice - Yellow discoloration of the skin.
- Bilirubinuria - Golden-brown coloration of the urine.
- Ascites: Portal vein hypertension results from increased resistance to blood flow through an inflamed and fibrotic liver. This can lead to ascites, accumulation of fluid in the peritoneal cavity.
- Increased Systemic Estrogen Levels: The liver may become unable to process particular hormones, leading to their peripheral conversion into estrogen. High levels promote:
- Breast development (gynecomastia).
- Spider Angiomata - dilated arterioles most often visible on the skin of the upper chest.
- Testicular atrophy.
- Lower Extremity Edema: Impaired synthesis of the protein alburmin leads to lower intravascular oncotic pressure and resultant leakage of fluid into soft tissues. This is particularly evident in the lower extremities.
- Varices: In the setting of portal hypertension, blood "finds" alternative pathways back to the heart that do not pass through the liver. The most common is via the splenic and short gastric veins, which pass through the esophageal venous plexus enroute to the SVC. This causes esophageal varices which can bleed profoundly, though these are not apparent on physical examination. A much less common path utilizes the recanalized umbilical vein, which directs blood through dilated superficial veins in the abdominal wall. These are visible on inspection of the abdomen and are known as Caput Medusae.
- Coffee Ground Emesis: Patients with advanced liver disease are prone to upper GI bleeding. This can be from varices as mentioned above. Also from gastritis, portal gastropathy or ulcers (as can occur in those without liver disease). The resulting vomitus can have visible blood or appear darker (like "coffee grounds"), which occurs as a result of exposure to gastric acid.
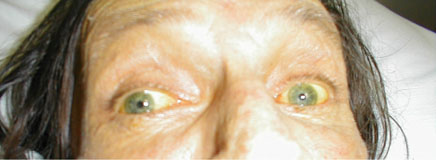
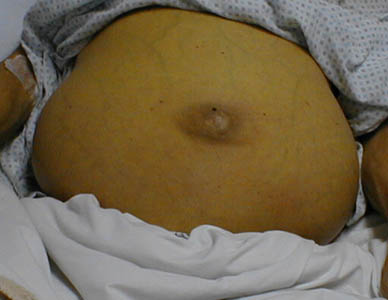
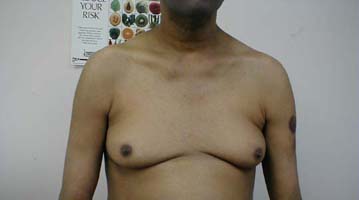

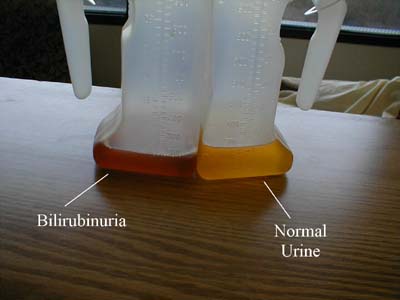
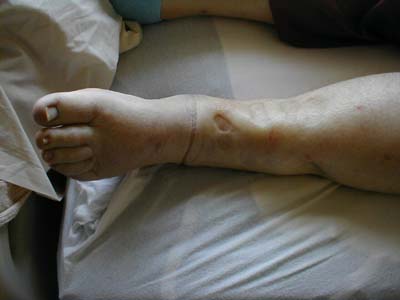
Click here to access Unit Two Content..
Topic 3: Summary
- The general approach to examination in the respiratory, abdominal and cardiovascular follows the IPPA (Inspection, Palpation, Percussion and Auscultation)
- The stethoscope is used in the examination of abdominal, cardiovascular and respiratory system.
- The accepted position of a clinician during examination is the right side of the patient unless one is left handed or other limiting factors do not permit this position.


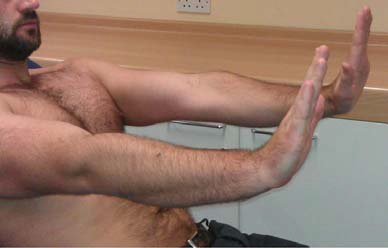